Dash Evo Tool#
Dash Evo Tool is an application designed to help you vote on usernames, withdraw evonode credits, manage tokens, and complete an expanding list of Platform actions. This guide describes how to download, install, and use the Dash Evo Tool.
Installation#
Note
The Dash Evo Tool requires a running Dash Core full node.
Linux, MacOS, or Windows packages are available on the GitHub releases page. Download the zip file for your Operating System, then unzip the downloaded file:
Configuration#
The Dash Evo Tool includes a configuration file that will work without modification. If you have a custom Dash Core config file that you want to continue using, expand the dropdown below for advanced configuration details.
Advanced configuration - using a custom Dash Core config
Note
The default location of the dash.conf file can be found in the Dash Core documentation.
Open the directory where the download was unzipped.
Open the
.envfile (you may need to show hidden files to see it). For the network you plan to connect to, make the following changes. Replace the*with the network name (MAINNET or TESTNET):Update
*_CORE_RPC_USERto match therpcuservalue from your Dash Core dash.conf file.Update
*_CORE_RPC_PASSWORDto match therpcpasswordvalue from your Dash Core dash.conf file.If your dash.conf includes
rpcallowip, update*_CORE_HOSTwith that IP address.If your dash.conf includes
rpcport, update*_CORE_RPC_PORTwith that port.
Enable ZMQ by adding the following lines to your dash.conf file:
# Dash Evo Tool ZMQ config - mainnet
zmqpubhashchainlock=tcp://0.0.0.0:23708
zmqpubrawtxlocksig=tcp://0.0.0.0:23708
# Place under the [test] section
# Dash Evo Tool ZMQ config - testnet
zmqpubhashchainlock=tcp://0.0.0.0:23709
zmqpubrawtxlocksig=tcp://0.0.0.0:23709
At a minimum, the following values must be defined for RPC access to be enabled:
server=1
rpcuser=<some_user_name>
rpcpassword=<some_password>
Updating the env file#
When the application runs for the first time, it creates a application directory and copies the
.env file into it. It also stores application data in the directory. Any further updates to the
.env file must be made to the copy in the application directory.
Operating System |
Configuration File Path |
|---|---|
macOS |
~/Library/Application Support/Dash-Evo-Tool/ |
Windows |
C:\Users\<User>\AppData\Roaming\Dash-Evo-Tool\config |
Linux |
/home/<user>/.config/dash-evo-tool/ |
Running the application#
Note
On some macOS devices, you will need to approve the app in your security settings using the process described in Safely open apps on your Mac.
Once the .env file is configured, launch the Dash Evo Tool by double-clicking the file named
dash-evo-tool.
Alternatively, you can launch the application directly from your terminal. For example, on Linux, run:
./dash-evo-tool
Network selection#
The Dash Evo Tool supports both testnet and mainnet. To choose a network, navigate to the Network Selection screen and click the checkbox in the Select column for the desired network. Then click the Start button on that row to launch Dash Core.
Note
If you have Dash Core installed in a non-standard location or want to use a custom dash.conf file, configure those options in the advanced settings.
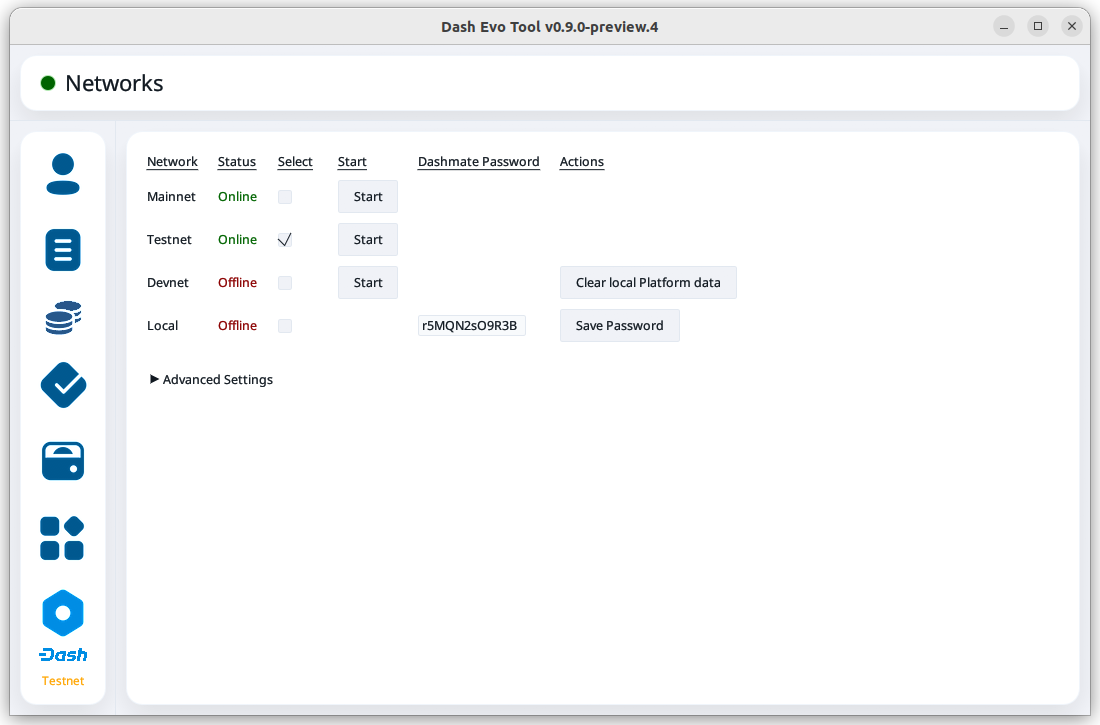
Network selection screen with testnet selected#
If you have Dash Core installed in a non-standard location, click Show more advanced settings, then click Select file to select the location of your Dash Core installation.
Also, if you use a custom dash.conf file, uncheck Overwrite dash.conf and make sure your file aligns with the RPC and ZMQ settings mentioned in the Configuration section.
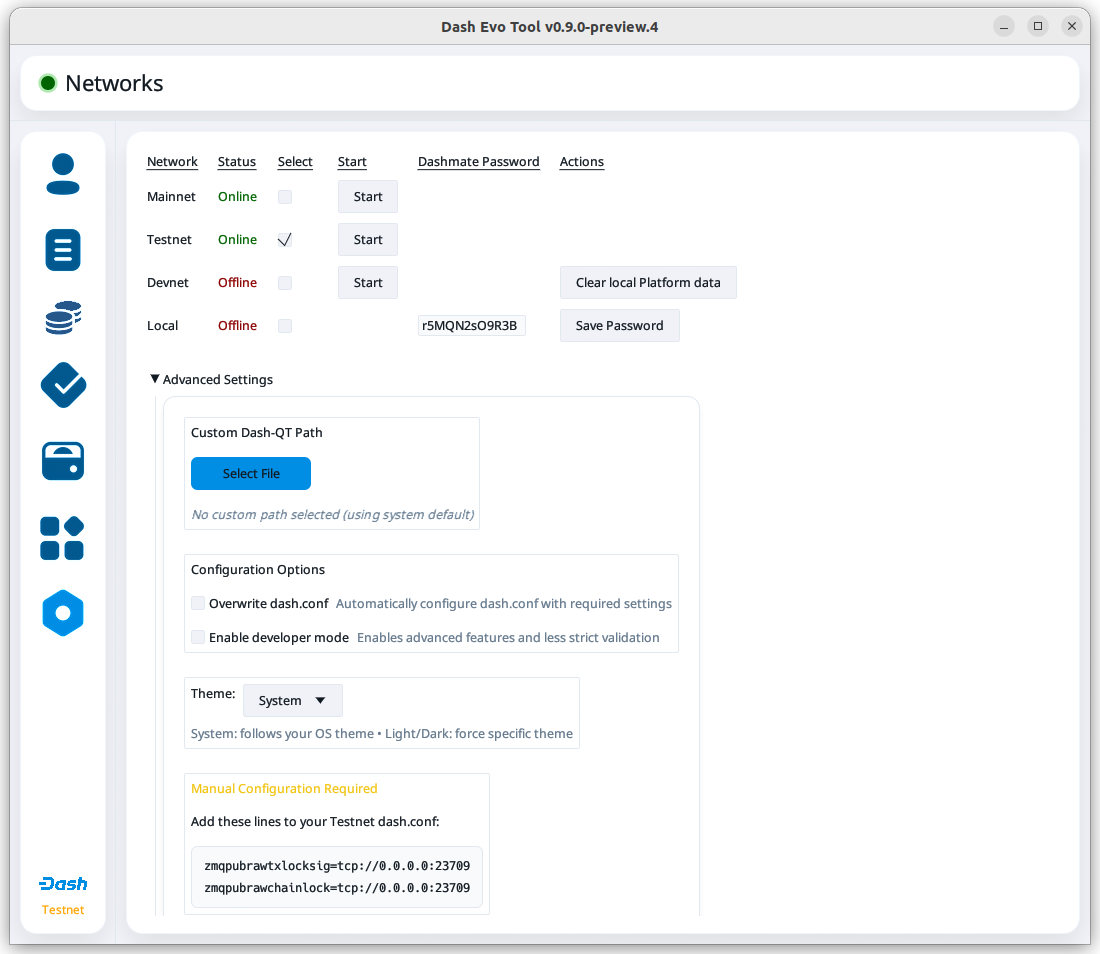
Network selection screen with advanced settings displayed#
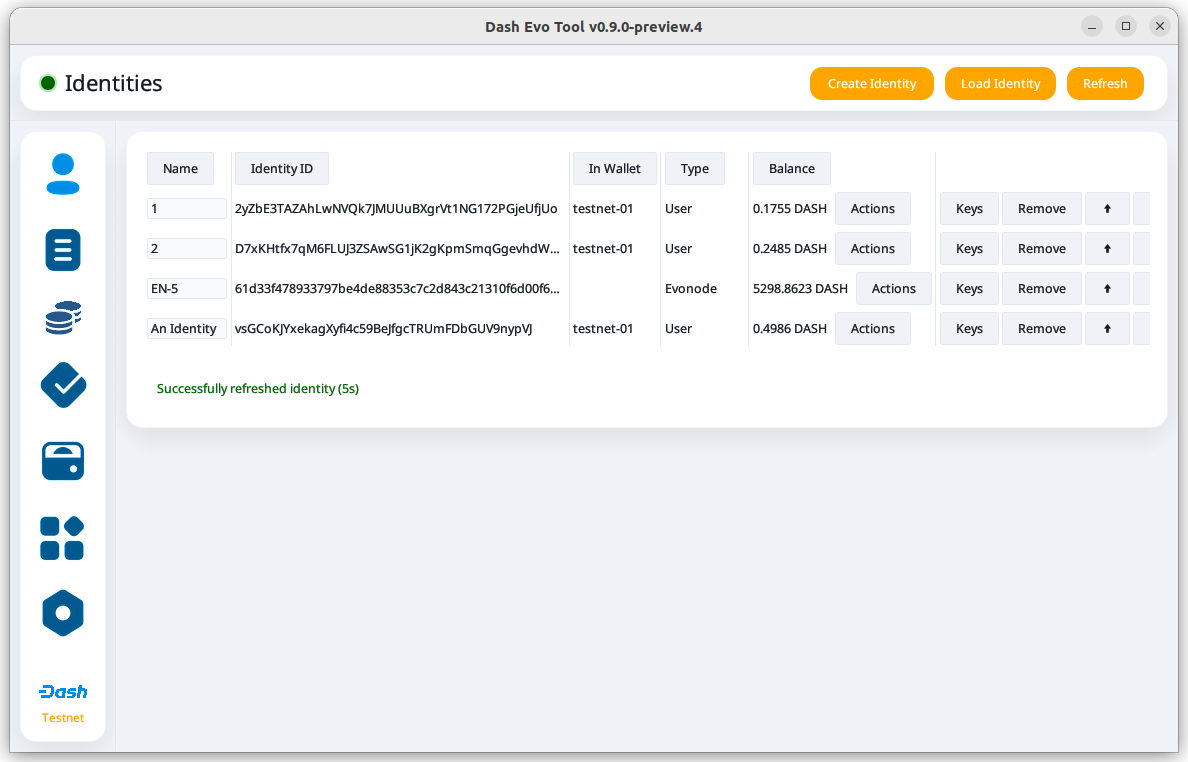
Identity operations#
Load existing identity#
On the main identity screen, click the Load Identity button on the upper right side of the screen.
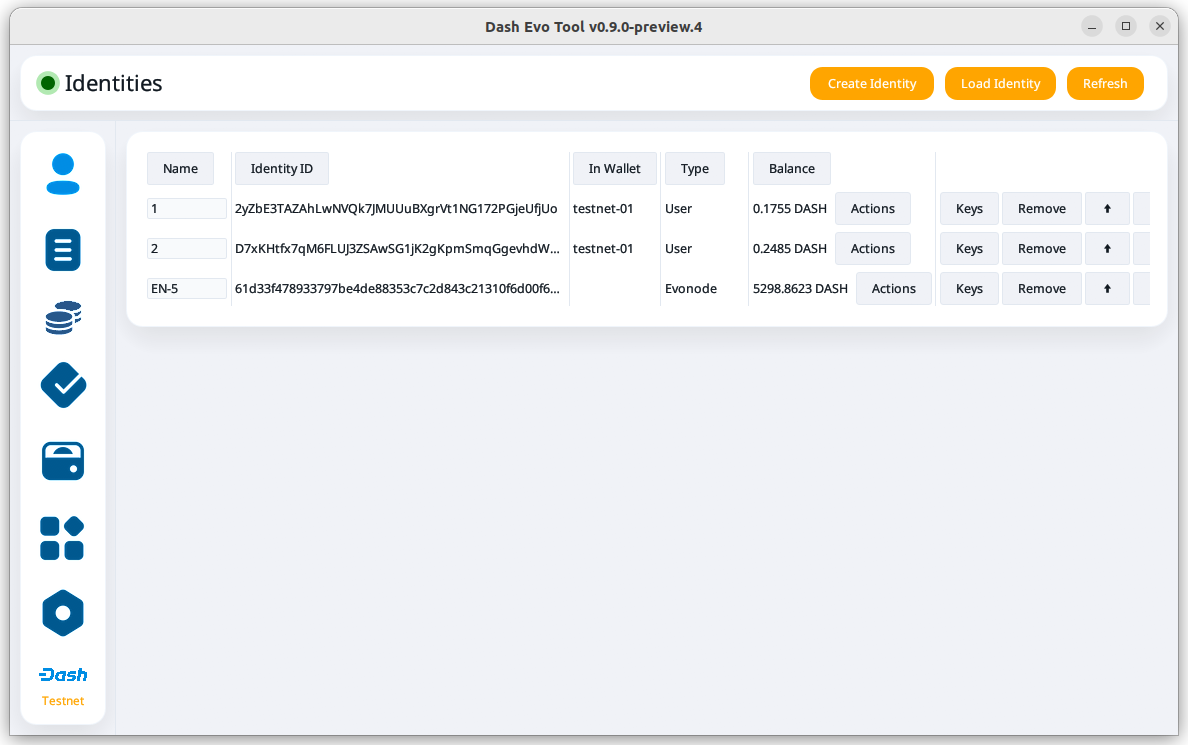
Main identity screen#
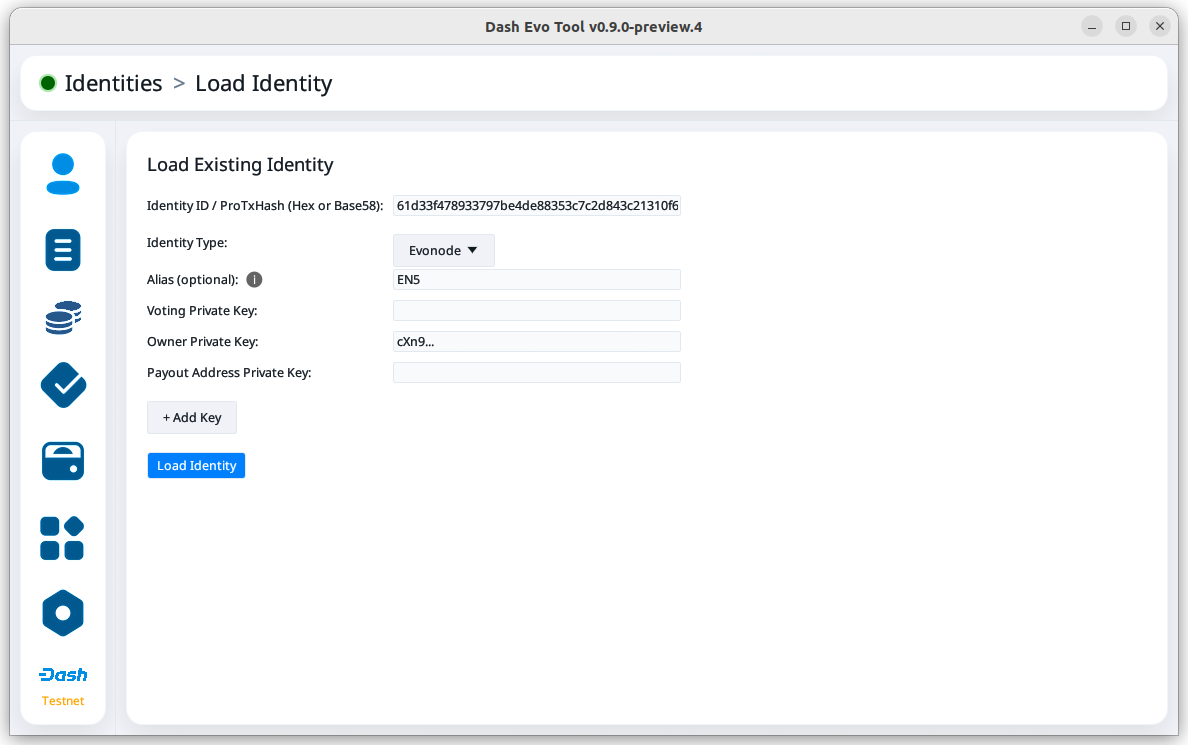
Some identity types require different information. Use the Identity Type dropdown menu to select the type you want to add. In this example, an evonode identity is being added.
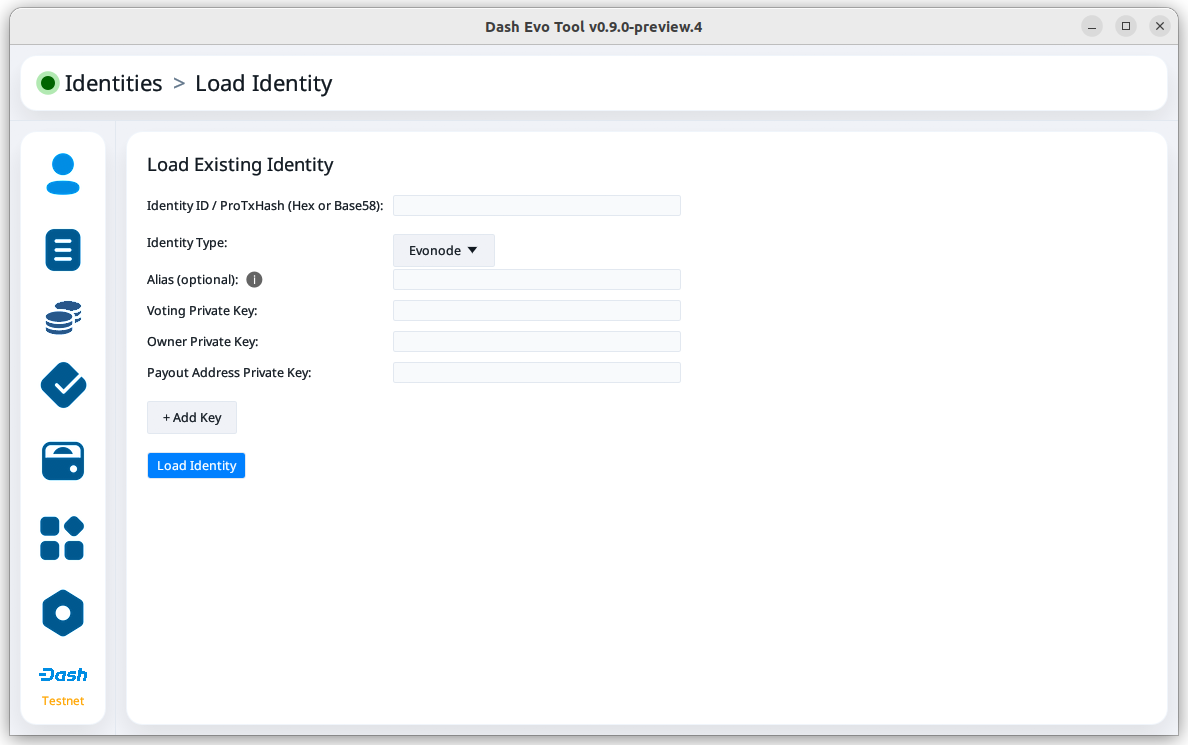
Identity load screen for evonode#
Attention
Your collateral key is not required. Do not enter it into the Dash Evo Tool.
Add the Identity ID and Owner Private Key. You may also want to add the Voting Private Key, but adding the Payout Address Private Key is not recommended. For a masternode or evonode, use the protx hash as the Identity ID.
If you use the Dash Masternode Tool, you can get the protx hash and private keys from the masternode details screen.

Dash Masternode Tool#
Click Load Identity once you have entered the required information.
Identity load screen with evonode info filled out#
Once the identity is loaded, you can view its balance and details about its keys. For evonodes, you can also initiate withdrawals.

Identity screen with an evonode identity loaded#
Create new identity#
Tip
Before creating an identity, make sure you have added a Dash Evo Tool wallet.
On the main identity screen, click the Create Identity button on the upper right side of the screen.
Main identity screen#
On the create identity screen, leave the first two options set to the default and select the funding method.
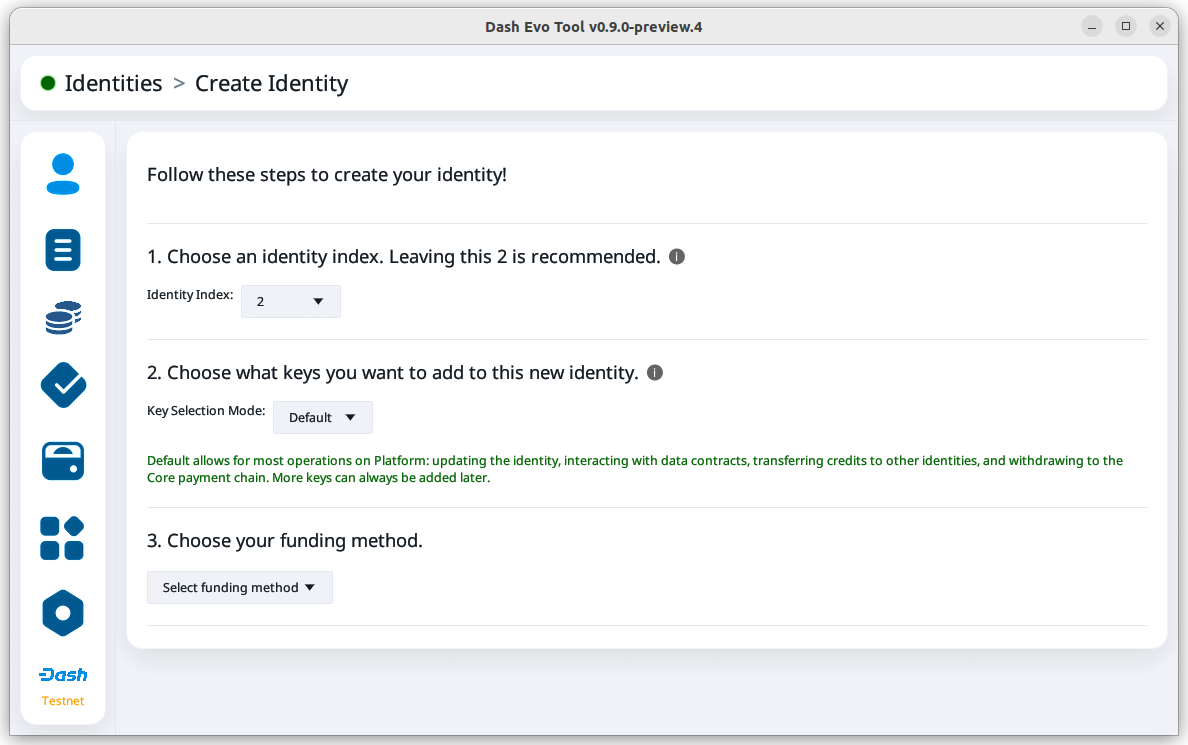
Identity create options#
Then, choose your funding method and send the requested amount of DASH to the provided address.
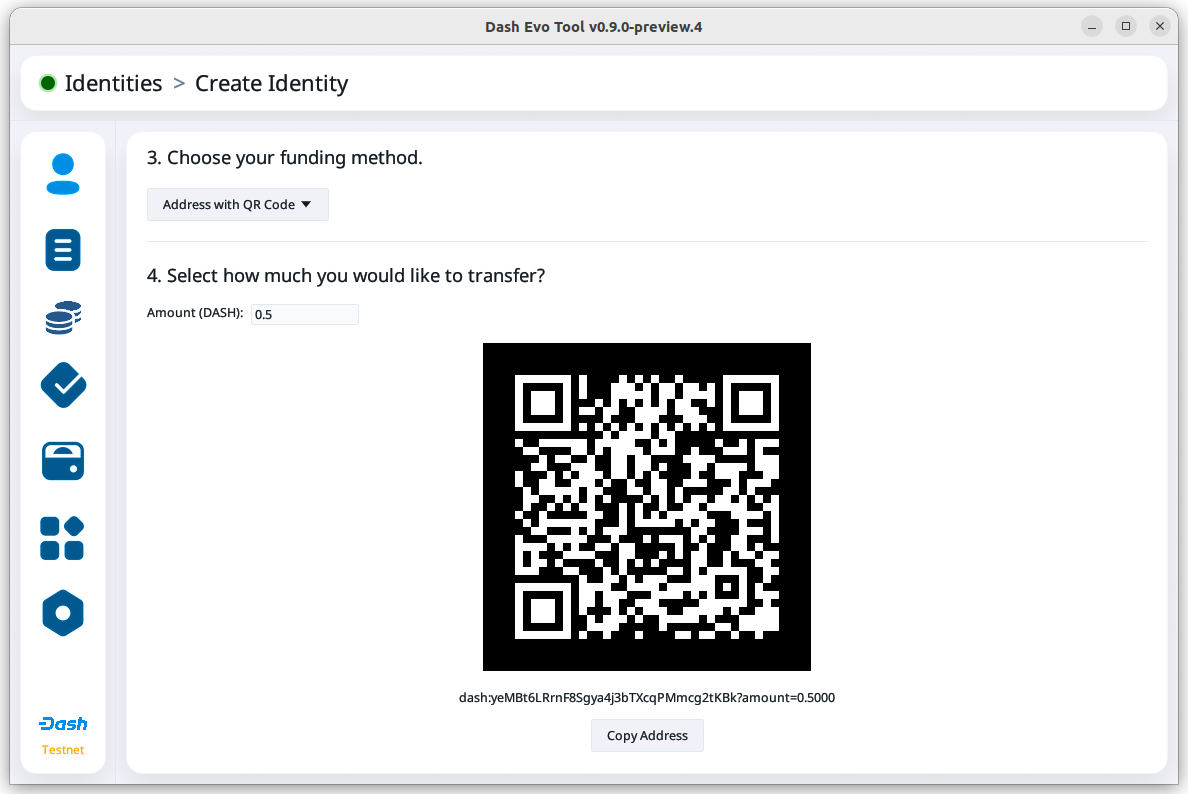
Waiting for funds#
The status will change from “Waiting for funds” to “Waiting for Core Chain to produce proof of transfer of funds”. Then, the status will change to “Waiting for Platform acknowledgement” once the funds have been received and the identity registration process has started.
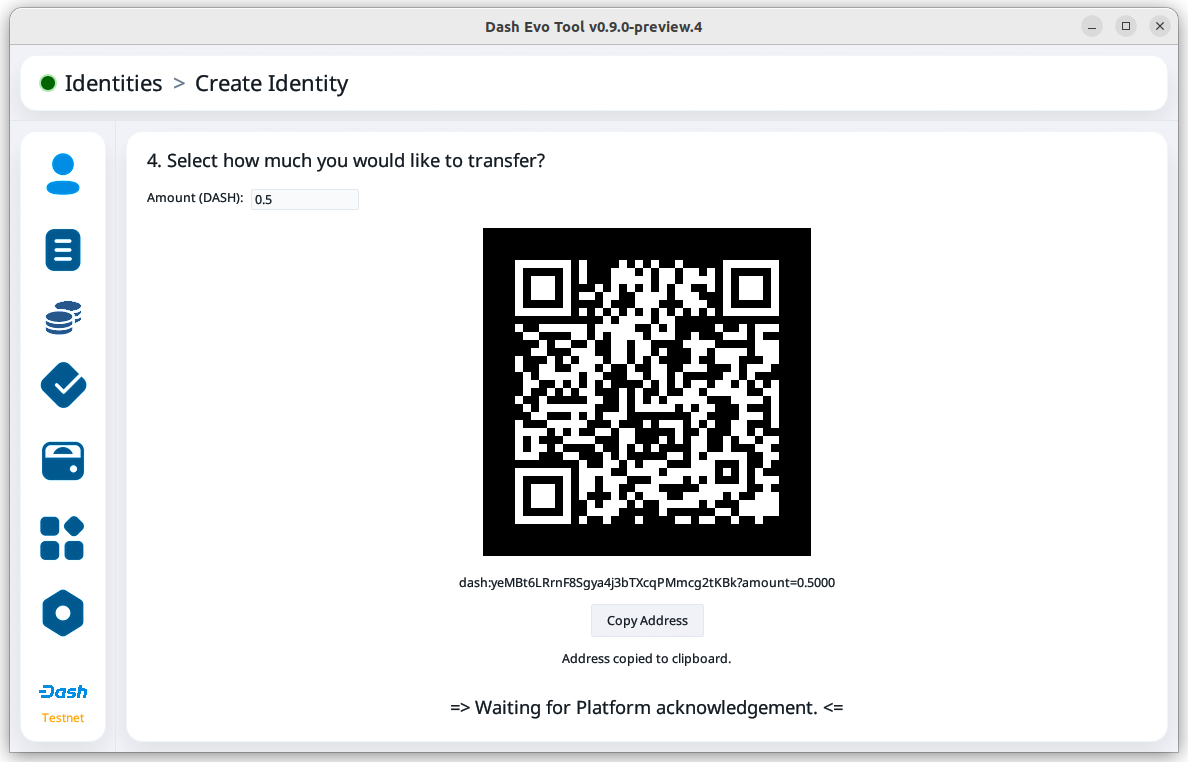
Waiting for Platform acknowledgement#
Once the identity has been registered, you can choose to return to the identity screen or proceed to registering a name.

Identity creation success#
Identity screen with the new identity loaded#
Top up identity#
Tip
Before topping up an identity, make sure you have added a Dash Evo Tool wallet.
Your identity’s credit balance will decrease as you use applications on Platform. You can increase your balance by doing an identity top up. On the main identity screen, click the Actions button for the identity you want to add credits to, then click Top up.
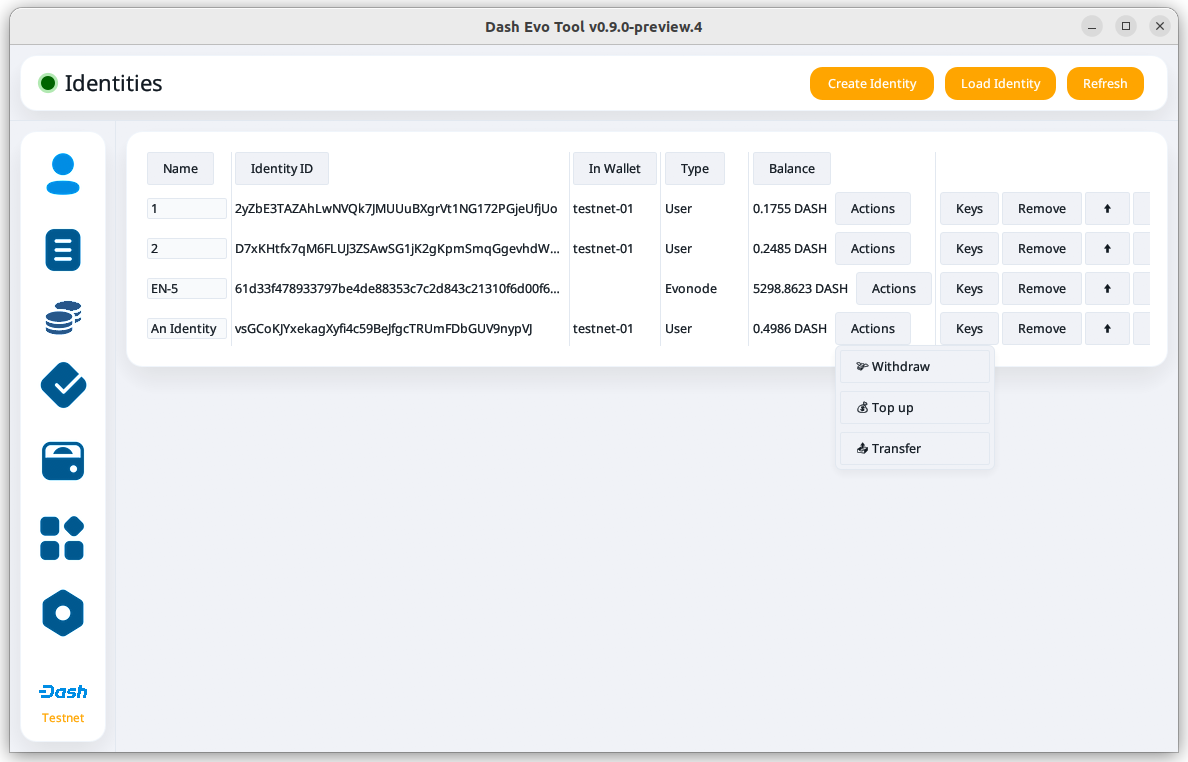
Identity actions menu#
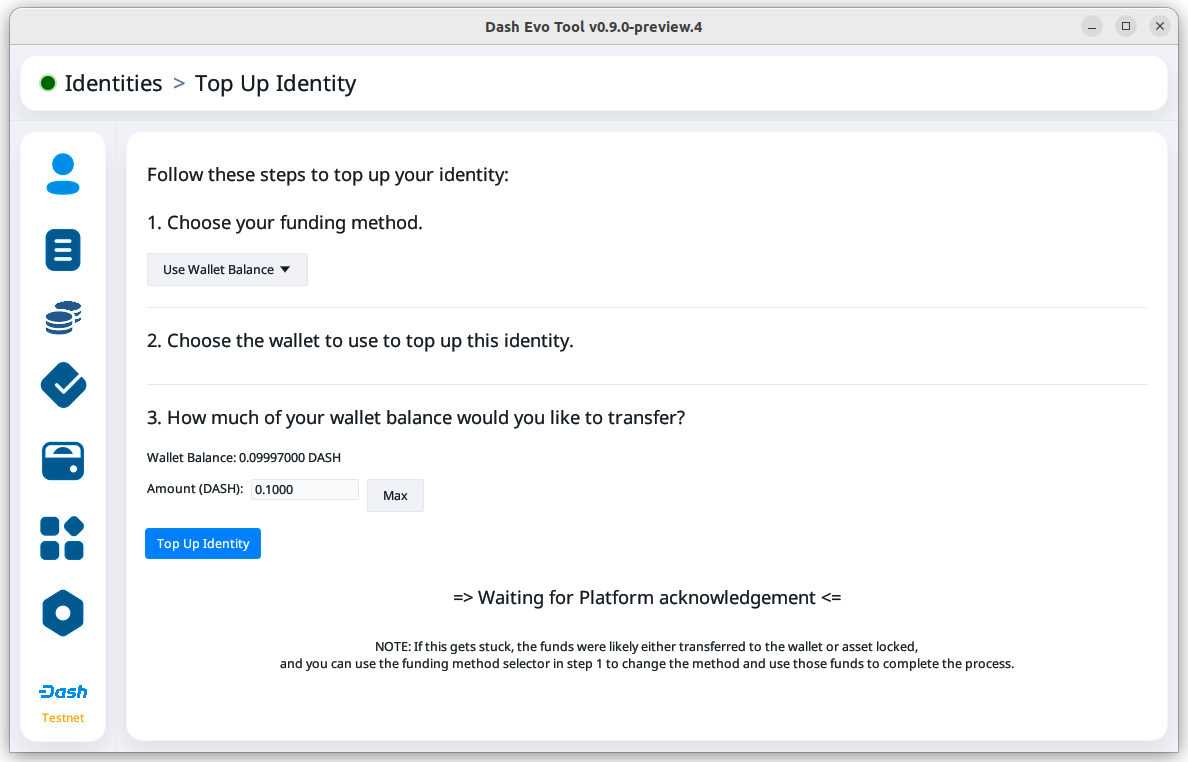
On the top up identity screen, select the funding method and funding amount. Then, click Top Up Identity to continue.
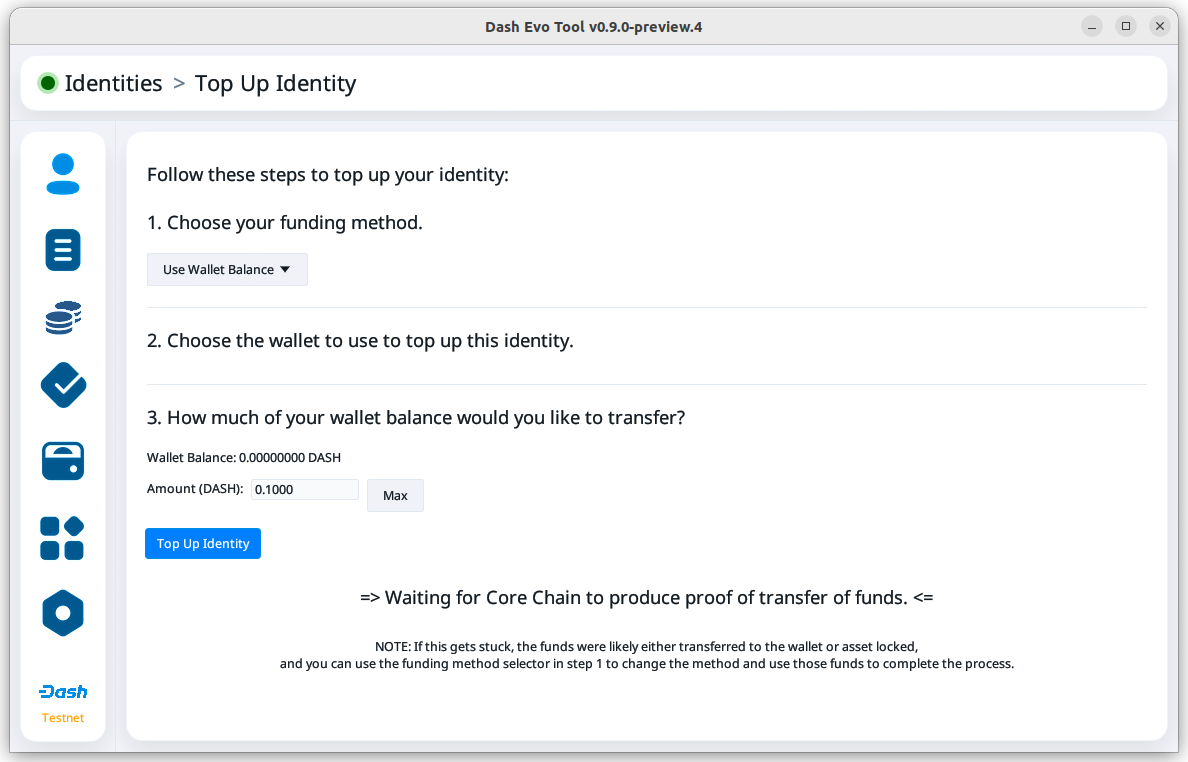
Waiting for funds#
The status will change from “Waiting for funds” to “Waiting for Platform acknowledgement” once the funds have been received and the identity top up process has started.
Waiting for Platform acknowledgement#
Once the top up is complete, a message will indicate it was successful.
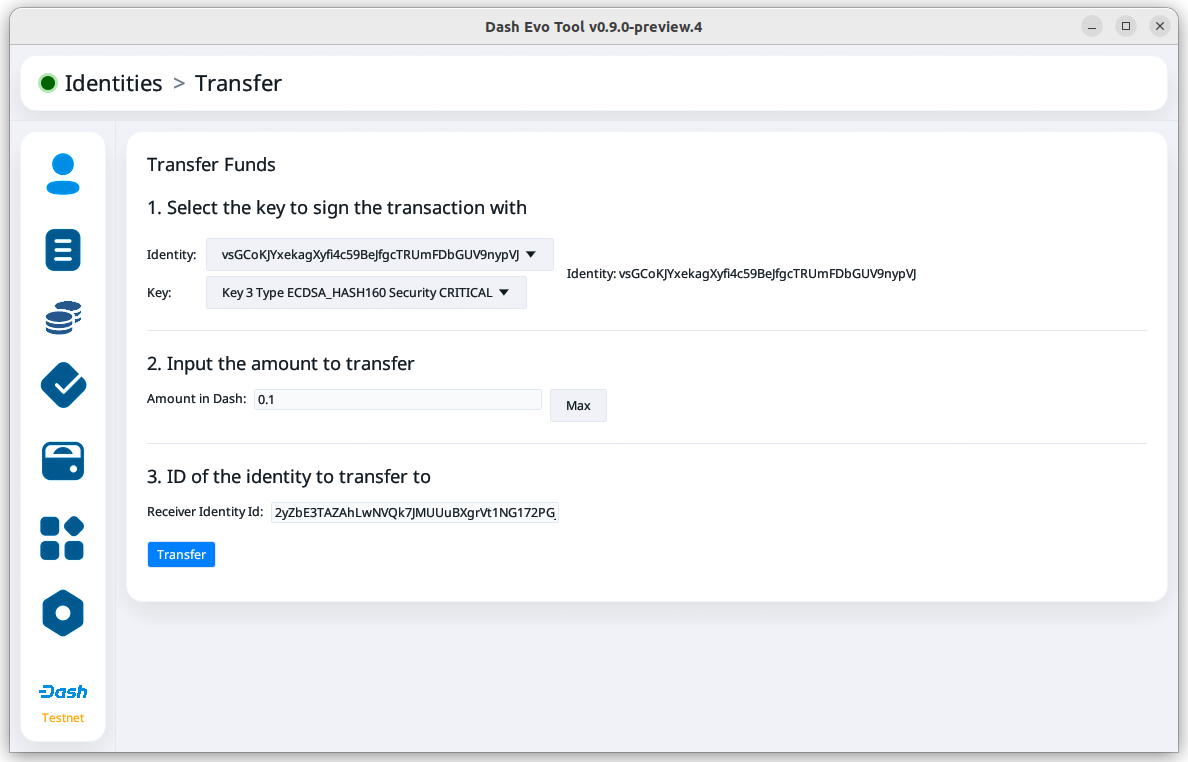
Transfer credits#
You can transfer credits to another identity by providing the identity’s ID. On the main identity screen, click the Actions button for the identity sending the credits, then click Transfer.
Identity actions menu#
On the transfer screen, set the amount and the identity ID to receive the transferred credits. Then, click Transfer to continue.
Transfer screen with transfer details entered#
When the withdrawal confirmation screen opens, confirm that the amount and destination identity ID are correct. Click Confirm to transfer the credits.
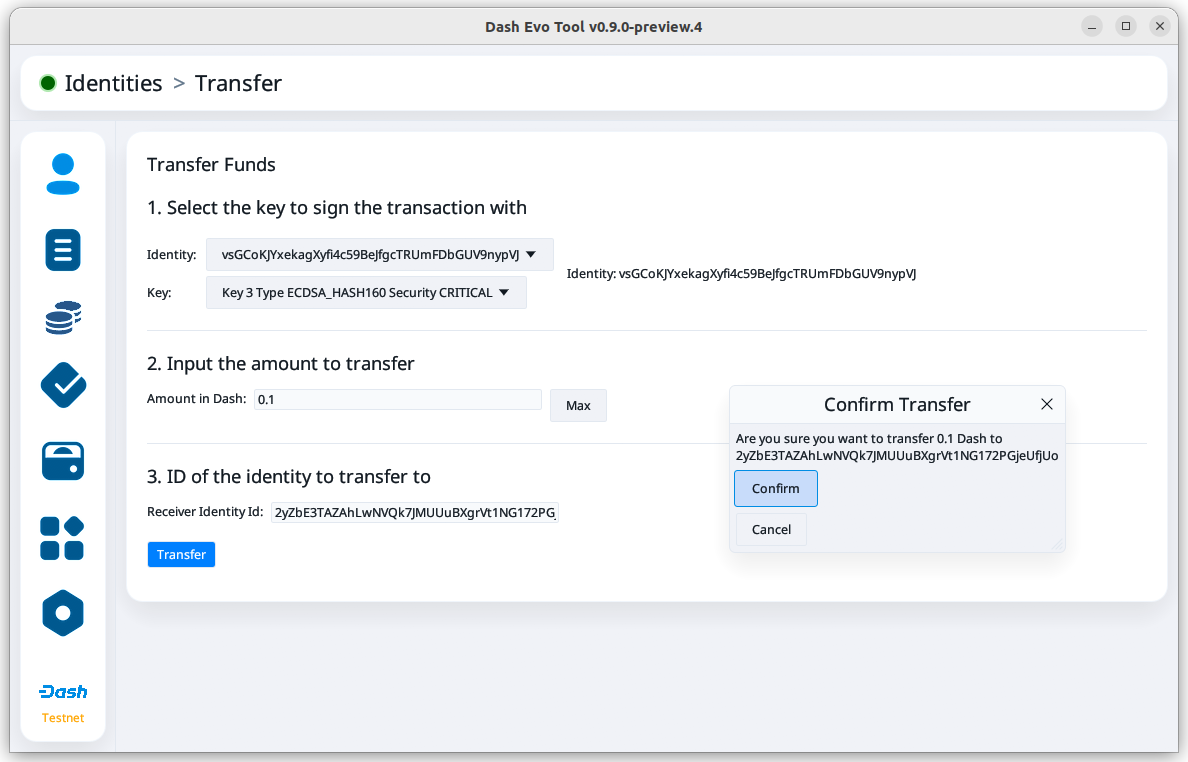
Transfer confirmation screen#
Once the transfer is complete, a message will indicate it was successful.
Evonode withdrawals#
Note
Withdrawal requests enter a queue for processing. For security, there is a limit on how much can be withdrawn from Platform daily. If withdrawal requests hit the daily limit, they will remain in the queue longer. For details, see this DCG development update.
From the identity main screen, click the Actions button for the identity requesting a withdrawal, then click Withdraw.
Withdraw screen#
On the withdrawal screen, select the key to sign the withdrawal. Selecting the owner key is recommended since this will direct the withdrawal to the payout address. Next, set the amount to withdraw.
Click Withdraw after entering the information.
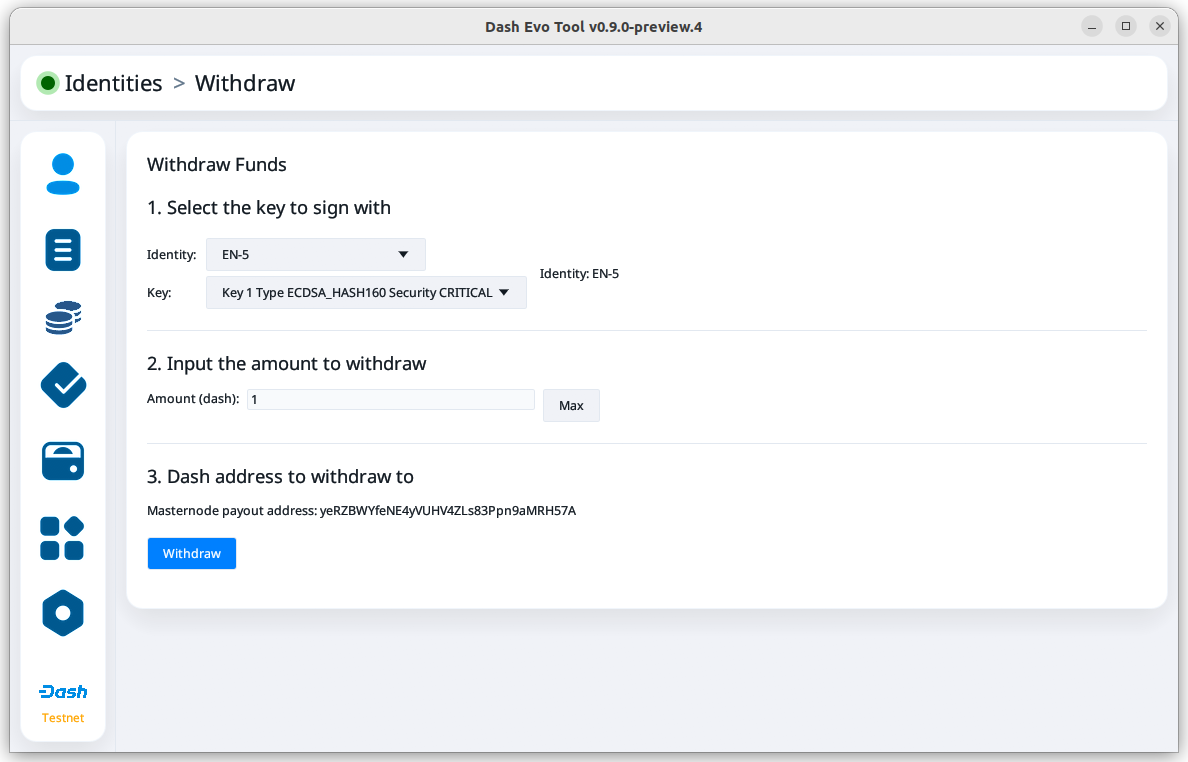
Withdraw screen with key and amount selected#
When the withdrawal confirmation screen opens, confirm that the amount and destination address are correct. Click Confirm to request the withdrawal.
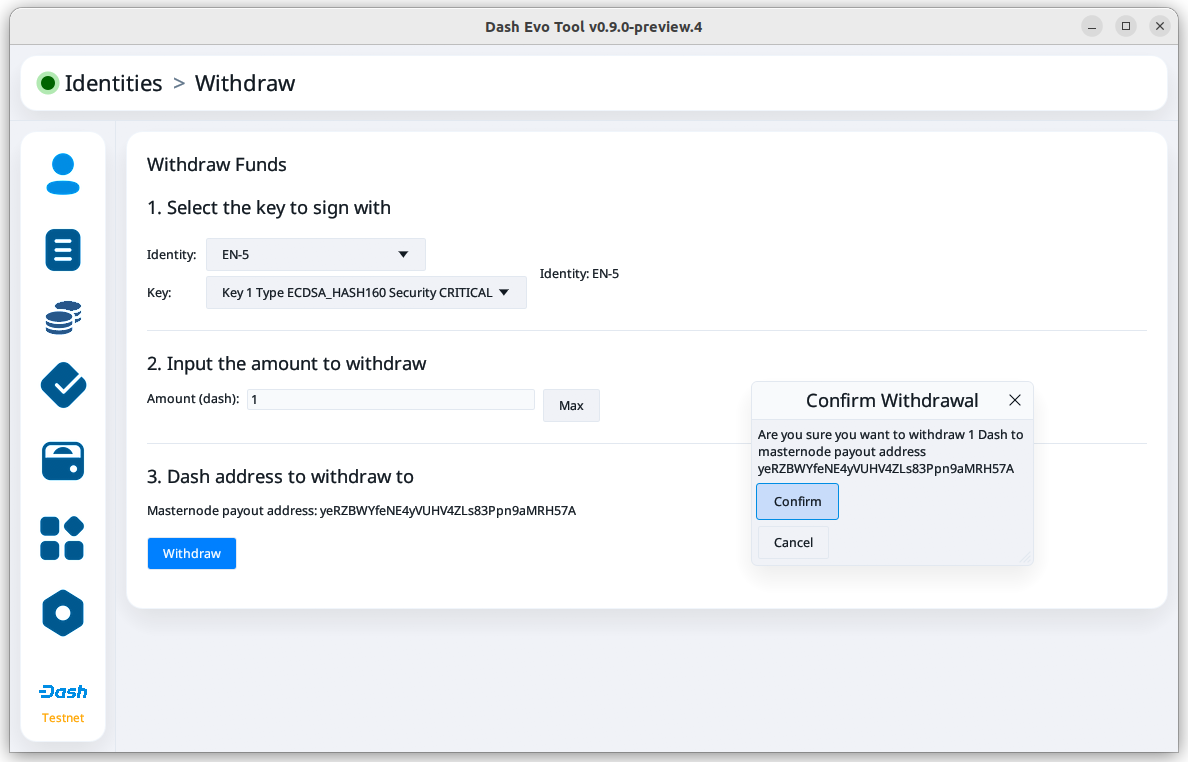
Withdrawal confirmation screen#
Name operations#
Register name#
After creating an identity, you can register a name for it. From the main name screen, click the Register Name button on the upper right side of the screen.
Name screen#
First, select the identity to register a name for. This step will be automatically done if you are registering a name as part of the identity creation process.
Next, enter the desired name. Notification will be provided if you selected a contested name and the estimated cost will be displayed. Click Register Name to complete the registration.
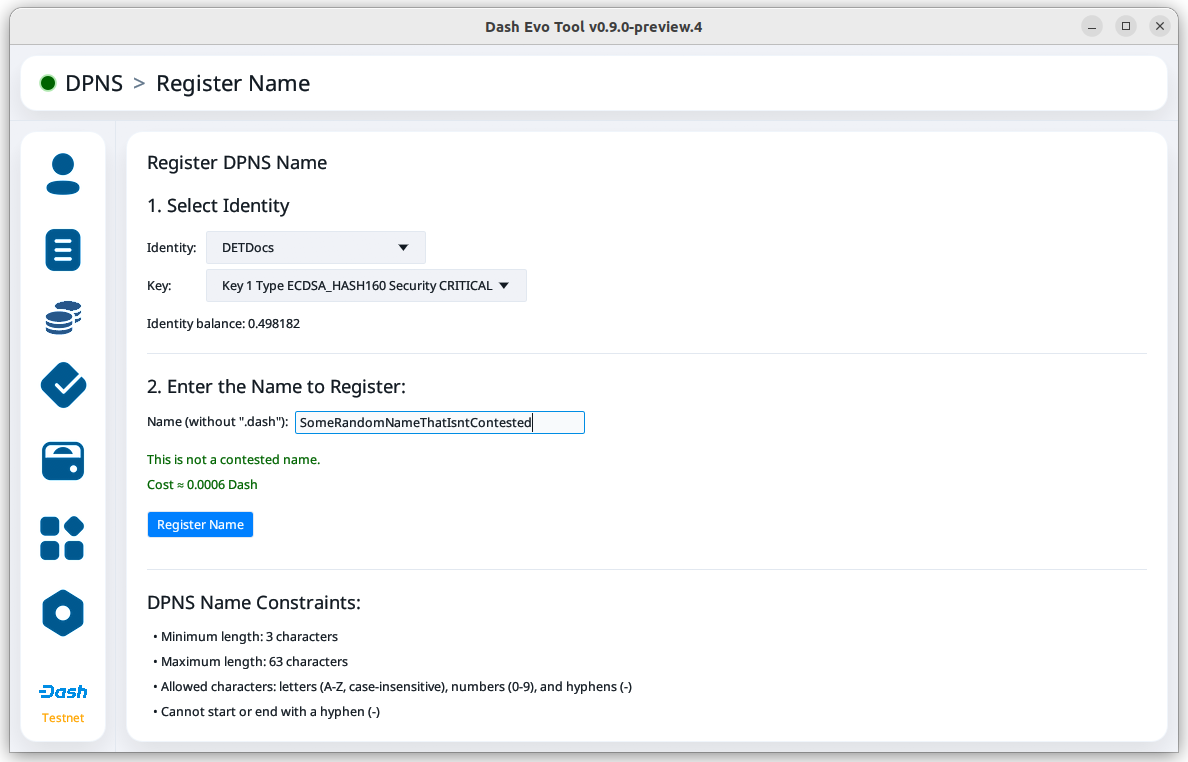
Name registration#
Upon successful registration, you can see the name on the My usernames screen along with any other names you have registered.
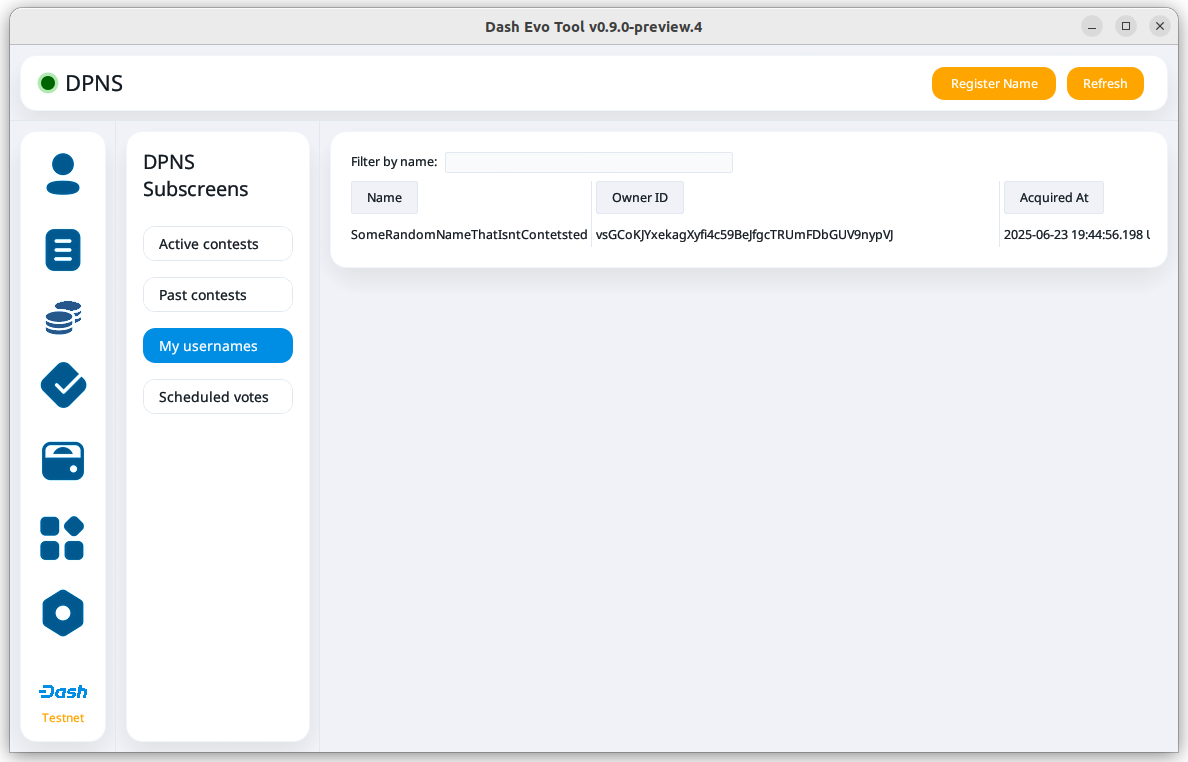
Name registered successfully#
Vote for names#
The Voting screen displays a list of names that are currently require a vote. Click the Refresh button to update the screen at any time.
Note
Voting can only be done by masternodes and evonodes, and each node can only modify its vote four times. See the load identity section for instructions on importing your keys.
To vote for a contestant, click on an entry in the Contestants column. You can also vote to Lock the name or Abstain from voting by clicking the value in those columns. Vote for multiple name contests simultaneously by making several selections.
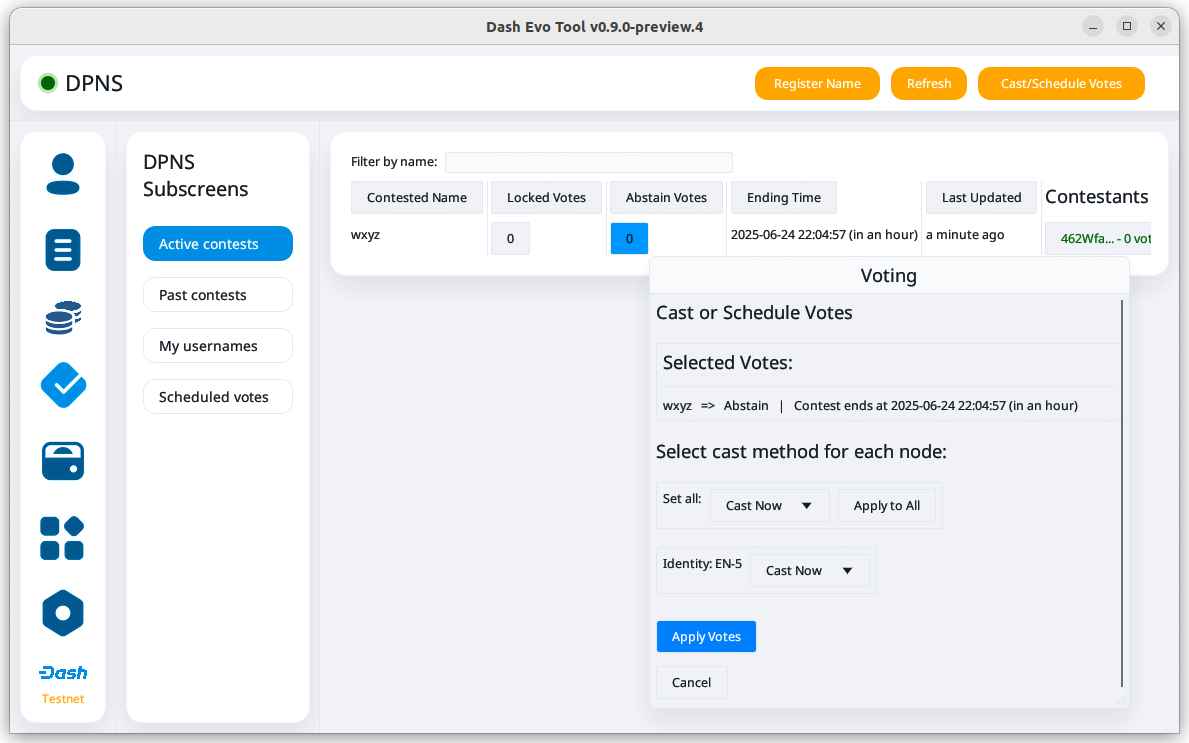
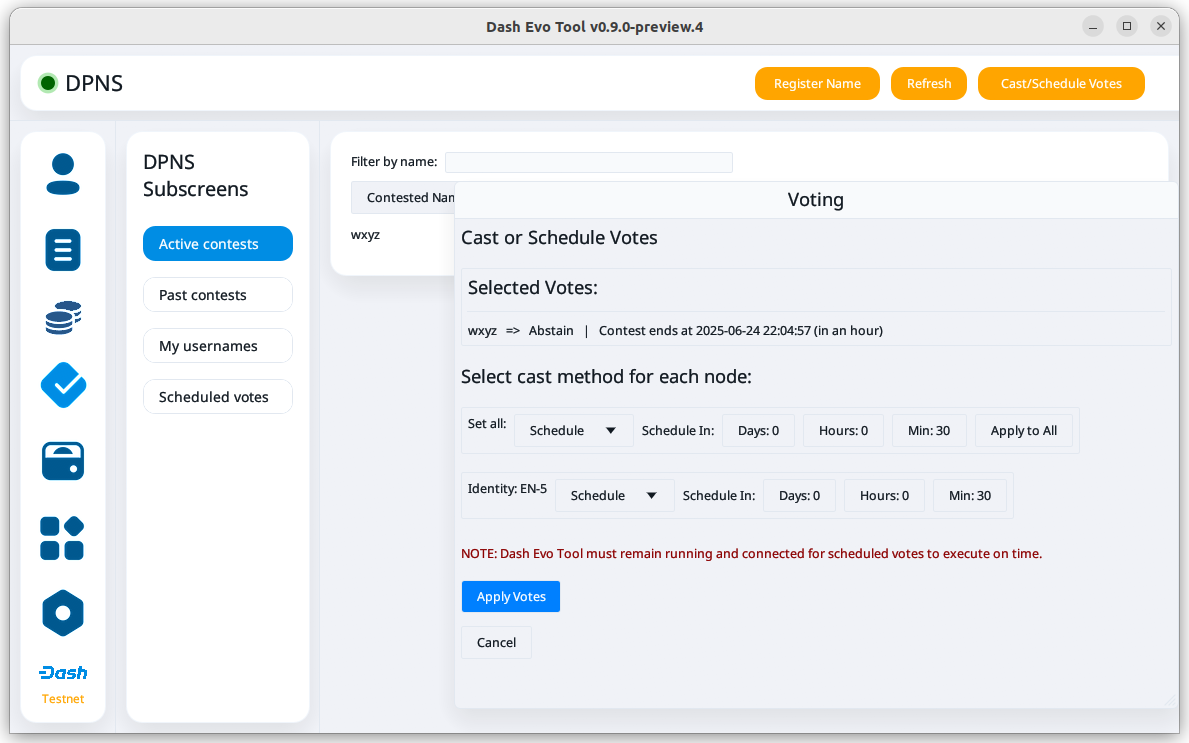
Once you have made selections for all contests you want to vote on, click the Cast/Schedule Votes button to open the voting screen. There you can chose to cast your votes immediately or schedule them for later.
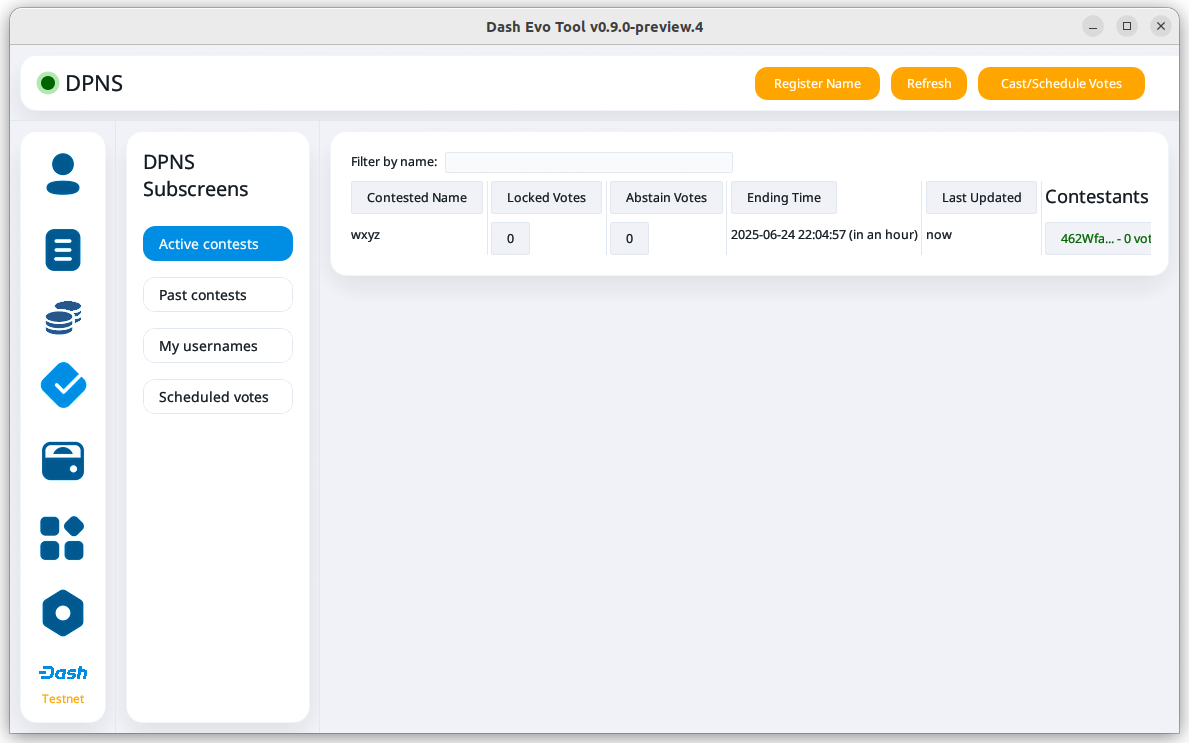
Voting screen#
Click Apply Votes after determining how to vote for each selected contest.
Scheduled votes#
Click Scheduled votes to view a list of any pending scheduled votes. Pending votes can be canceled by clicking the Remove button.
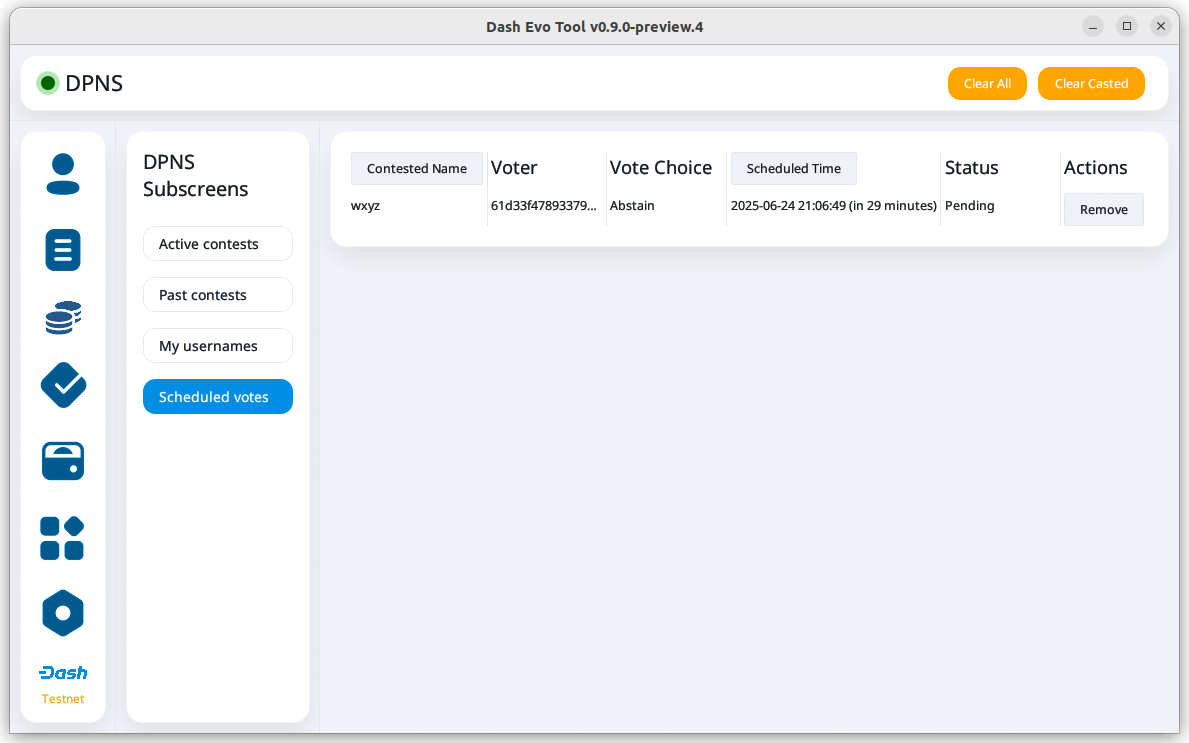
Scheduled votes screen#
See the DPNS page for more voting details.
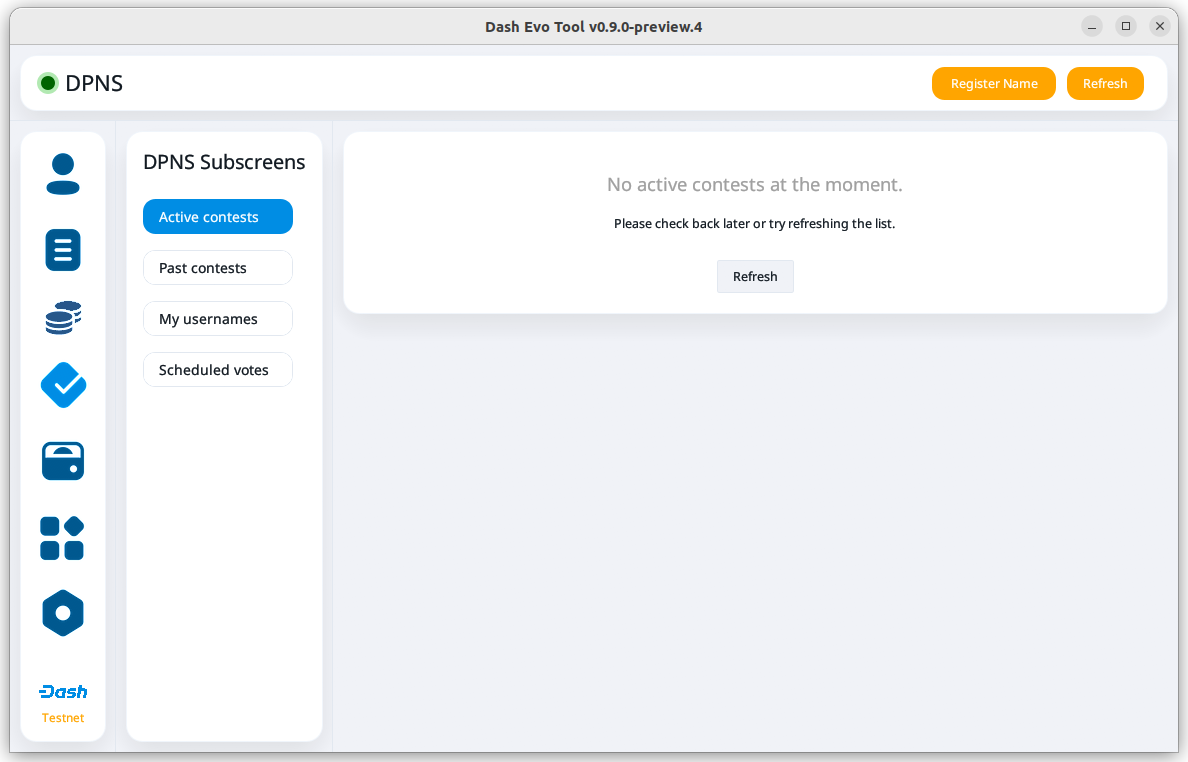
View contests#
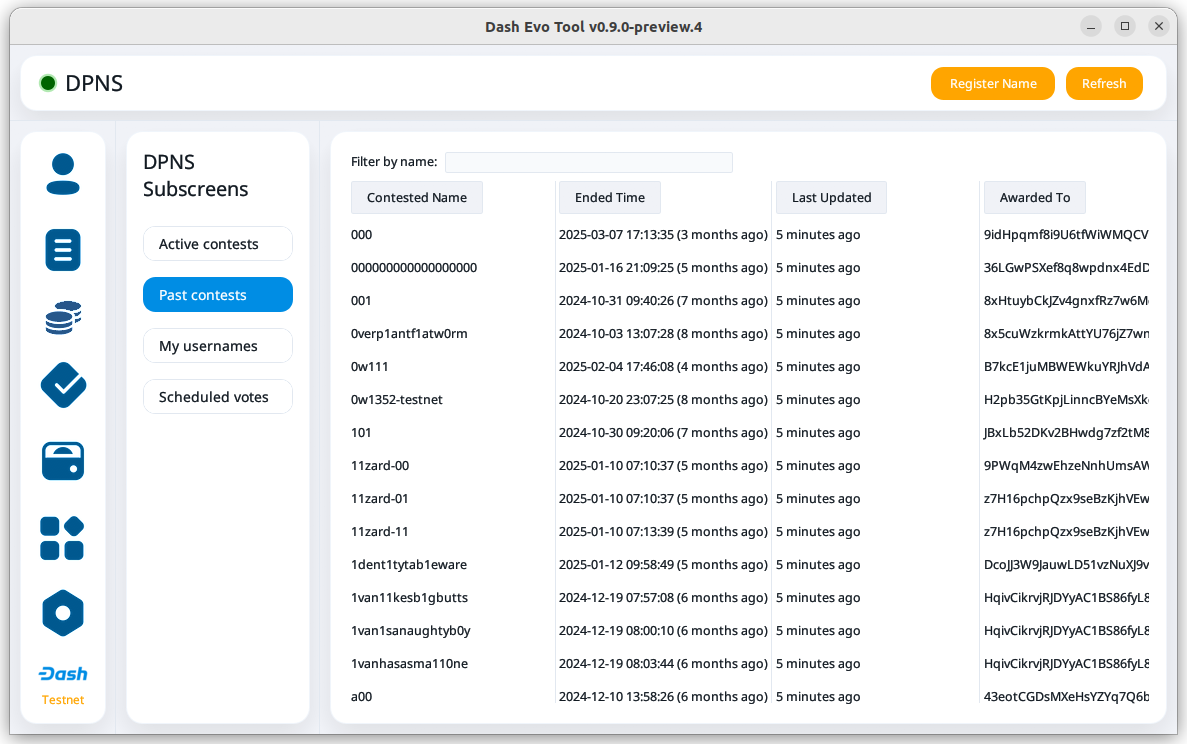
Click Active contests or Past contests to view a list current or previous contests.
My usernames#
Click My Usernames to view a list of usernames owned by your identities.
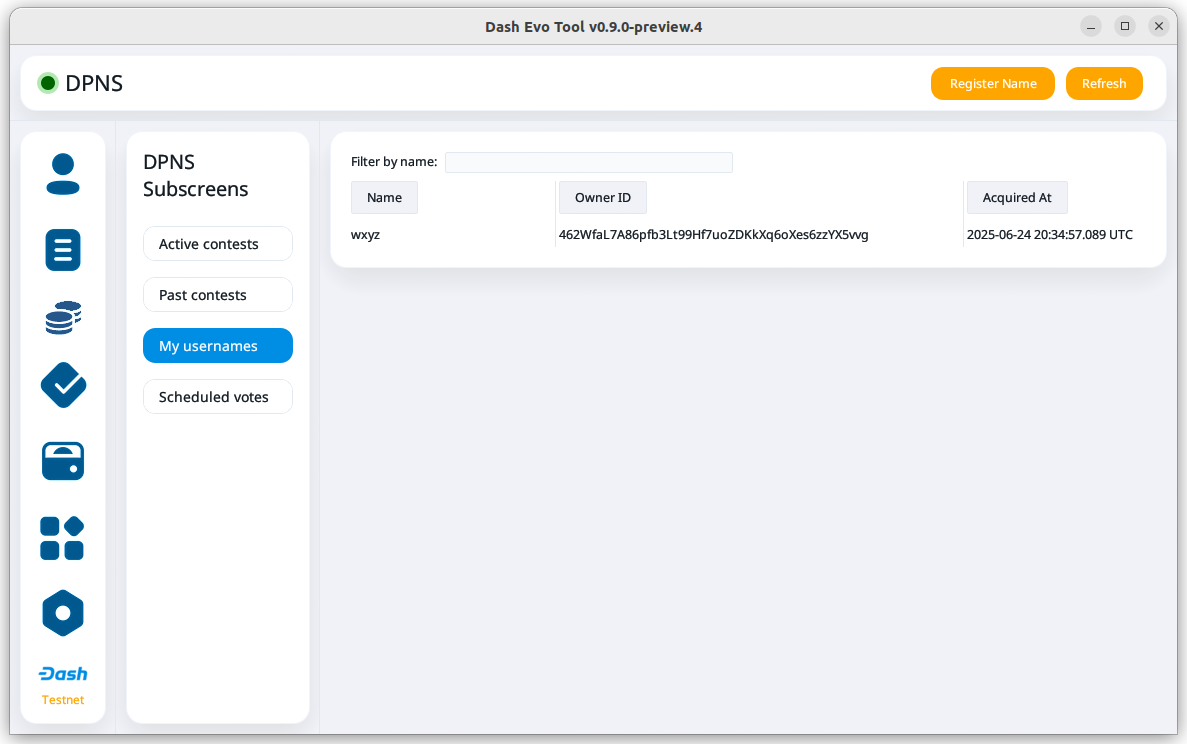
My usernames screen#
Token operations#
My tokens#
The My Tokens screen shows all tokens currently being tracked. Click the Refresh button to update the screen at any time or Add Token to follow additional tokens.
You can view token information and access token-related commands by clicking on a token name to open the Token Details screen.
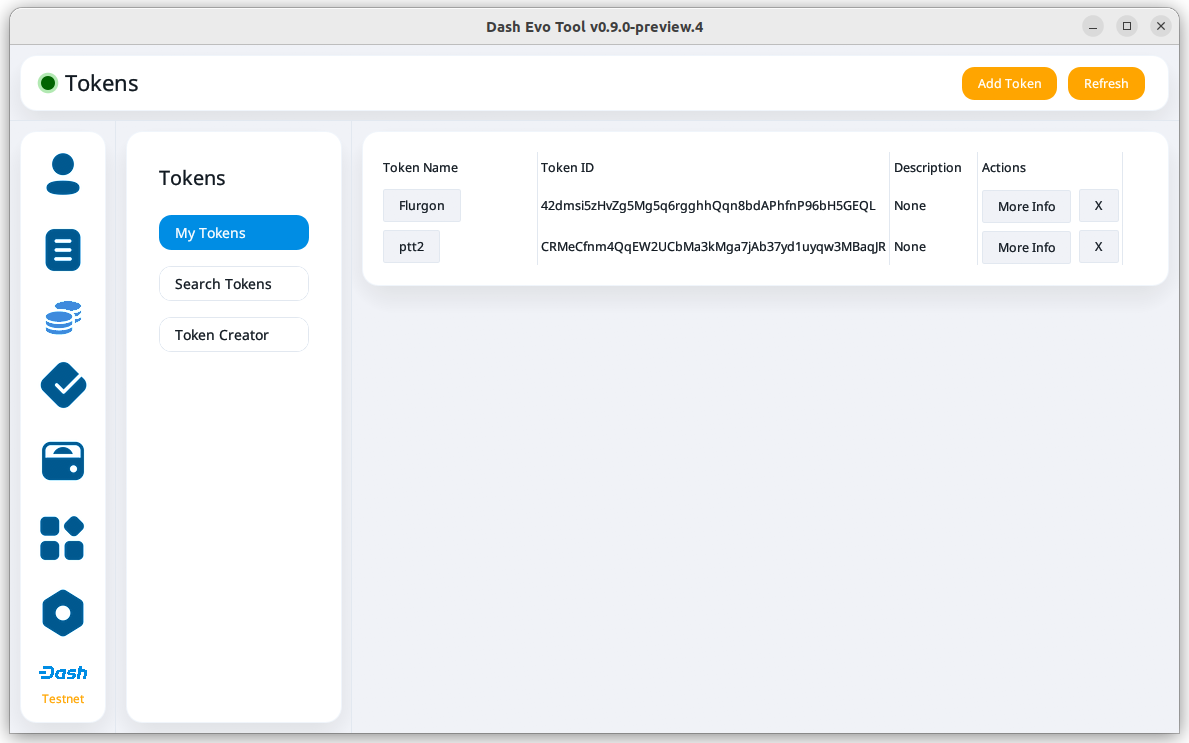
My Tokens screen#
The Token Details screen shows the balance for each of your identities and provides access to token-related actions (e.g., transfer).
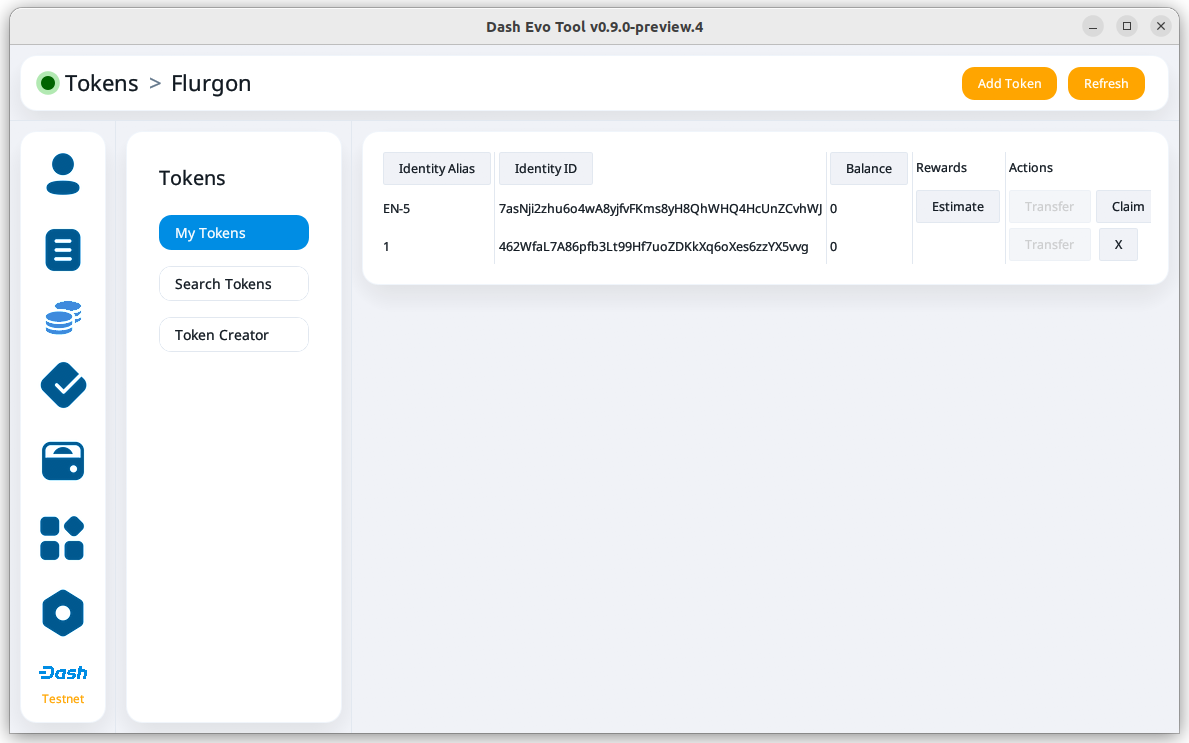
Token details screen#
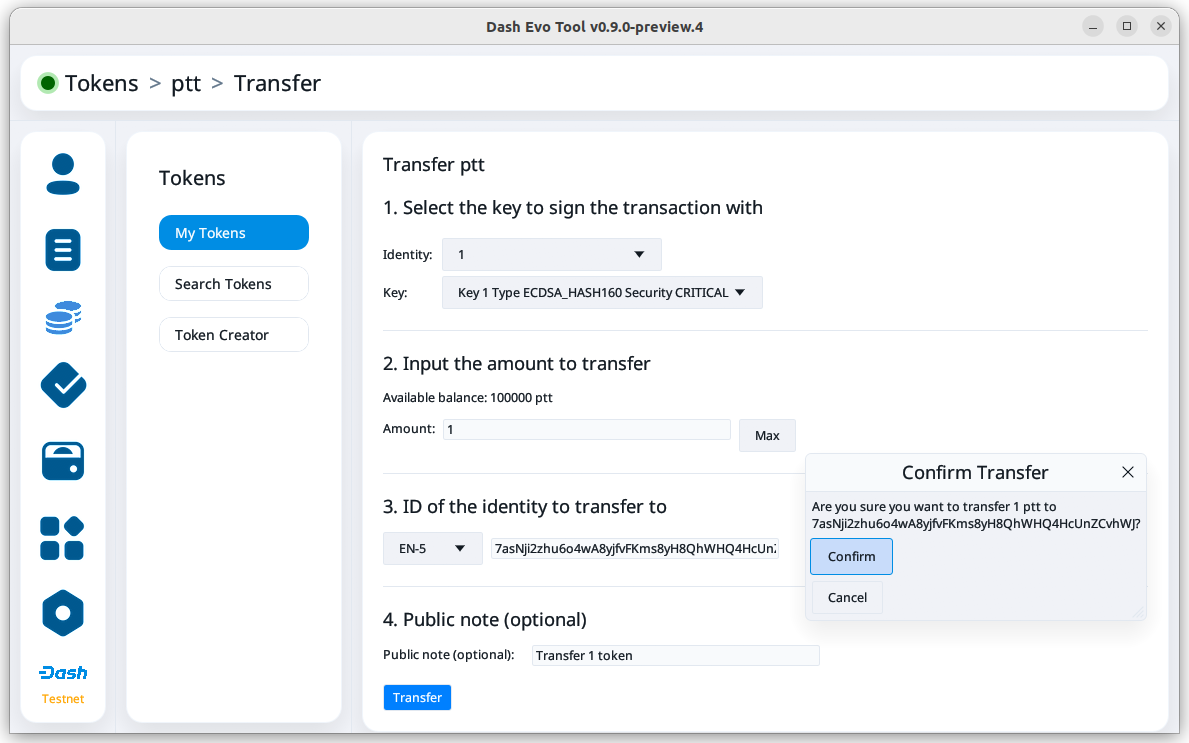
Token actions#
Note
Token actions can only be used when they are enabled by the token’s data contract configuration. Enabled actions can only be performed by authorized identities as defined in the token’s data contract.
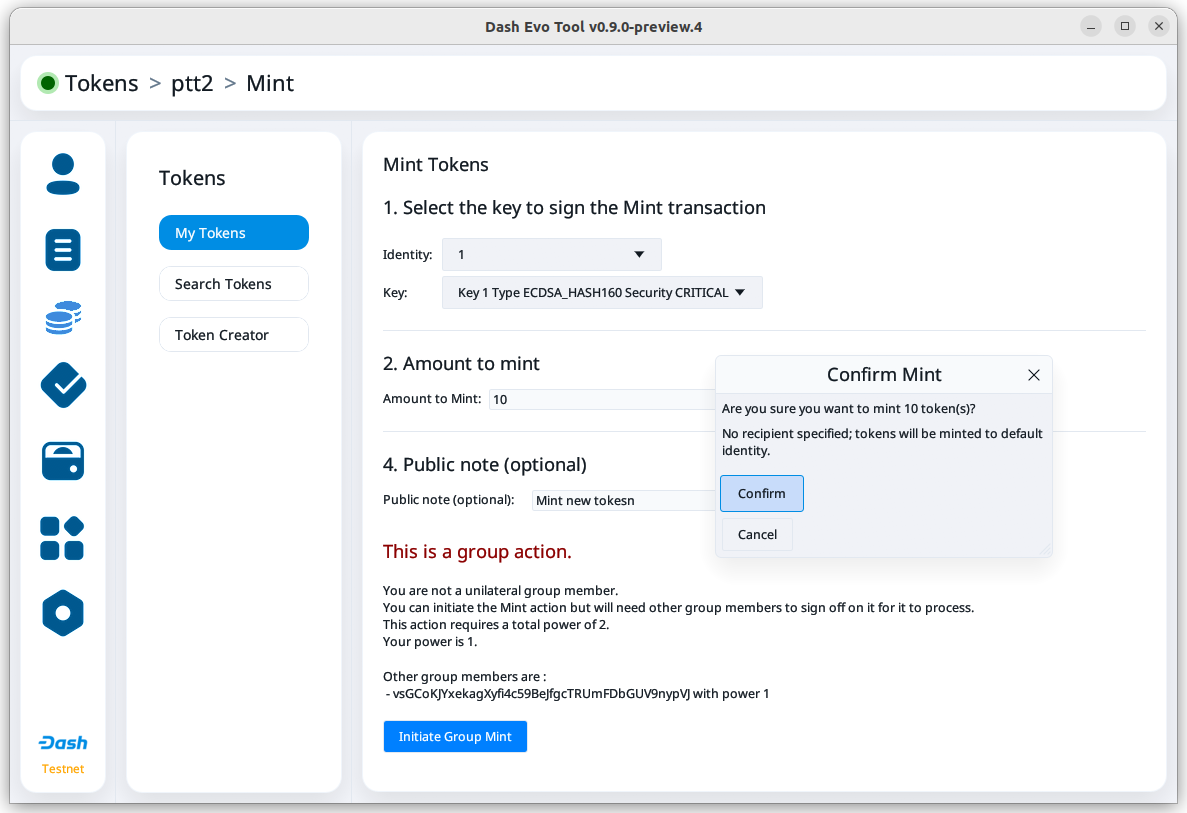
You can complete the following actions using the Dash Evo Tool:
Action |
Description |
|---|---|
Transfer |
Transfer tokens to another identity |
Claim |
Redeem or withdraw available tokens (e.g., from distribution) |
Mint |
Create new tokens and add them to the total supply |
Burn |
Permanently remove tokens from circulation |
Freeze |
Temporarily disable token transfers for a specific identity |
Destroy |
Permanently eliminate frozen tokens for a specific identity |
Unfreeze |
Re-enable transfers for a previously frozen identity |
Pause |
Halt all token operations temporarily |
Resume |
Reactivate operations after a pause |
View Claims |
Display information about completed token claims |
Update Config |
Modify token configuration settings |
Purchase |
Buy tokens that have set a price |
Set Price |
Define or update the price accepted for the token |
Search tokens#
The Search Tokens screen enables searching for tokens by the keywords assigned to them by the token creator during token registration.
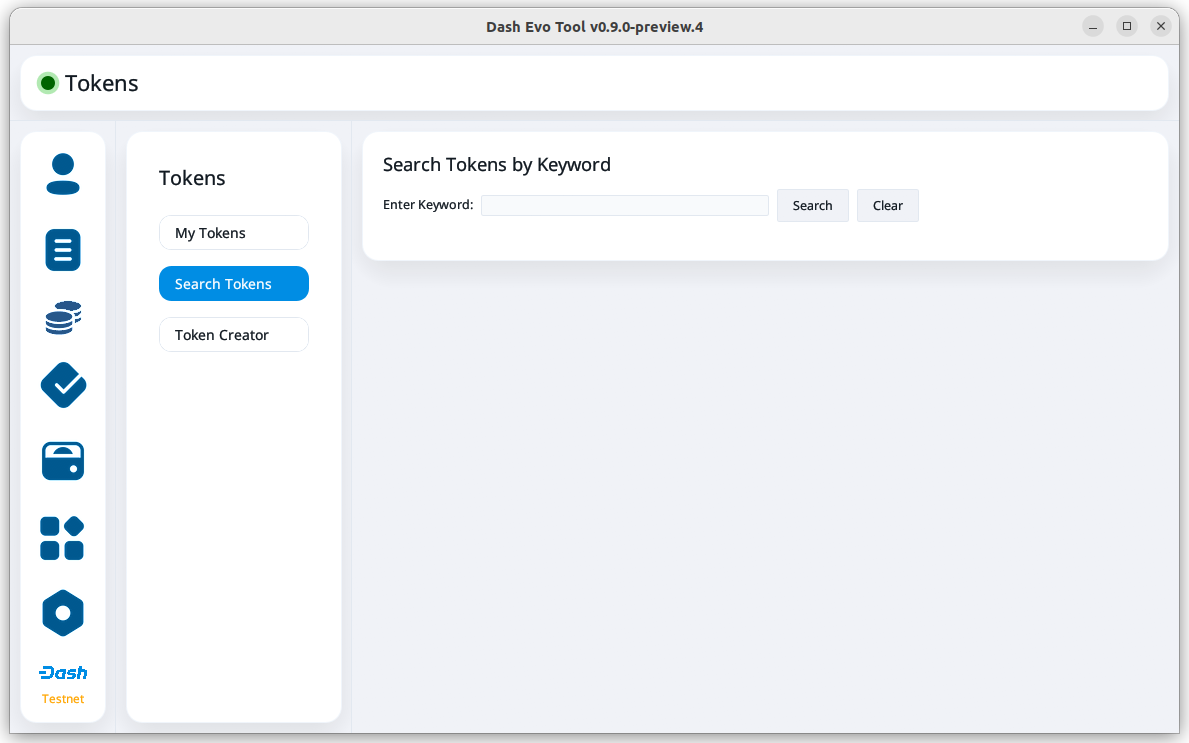
Token search screen#
Token Creator#
The Token Creator screen provides a comprehensive interface for creating and registering tokens on Dash Platform. It covers all configurable token attributes, ranging from basic supply details to advanced control mechanisms and distribution rules.
Token creator screen#
The following sections describe the token creator parameters used to configure your token.
Identity and Key Selection#
Select an identity and an associated key to register the token contract:
Identity: The Dash Platform identity that will own the token contract
Key: The key from the identity used to sign the registration, including purpose and security level
Note
Only valid identity/key pairs are permitted to register token contracts.
Token Information#
Name and Metadata
Token Name (singular): Name for a single unit of the token
Token Name (plural): Name for multiple units
Language: Localized language for token naming
Add singular name to keywords: Whether the token name will appear in token search queries
Description: Short (max 100 characters) description of the token
Supply Parameters
Base Supply: Number of tokens created at registration
Max Supply: Maximum possible token supply
Keywords
Contract Keywords: Comma-separated tags for categorization and querying
Advanced Settings (Optional)#
General Options
Start as paused: Contract starts paused after creation
Keep history: Enables historical recording. Advanced settings allow specifying which actions are logged.
Name should be capitalized: Forces capitalization of token name on display
Decimals: Number of decimal places for token divisibility
Action Rules#
Define which administrative actions are permitted after contract creation:
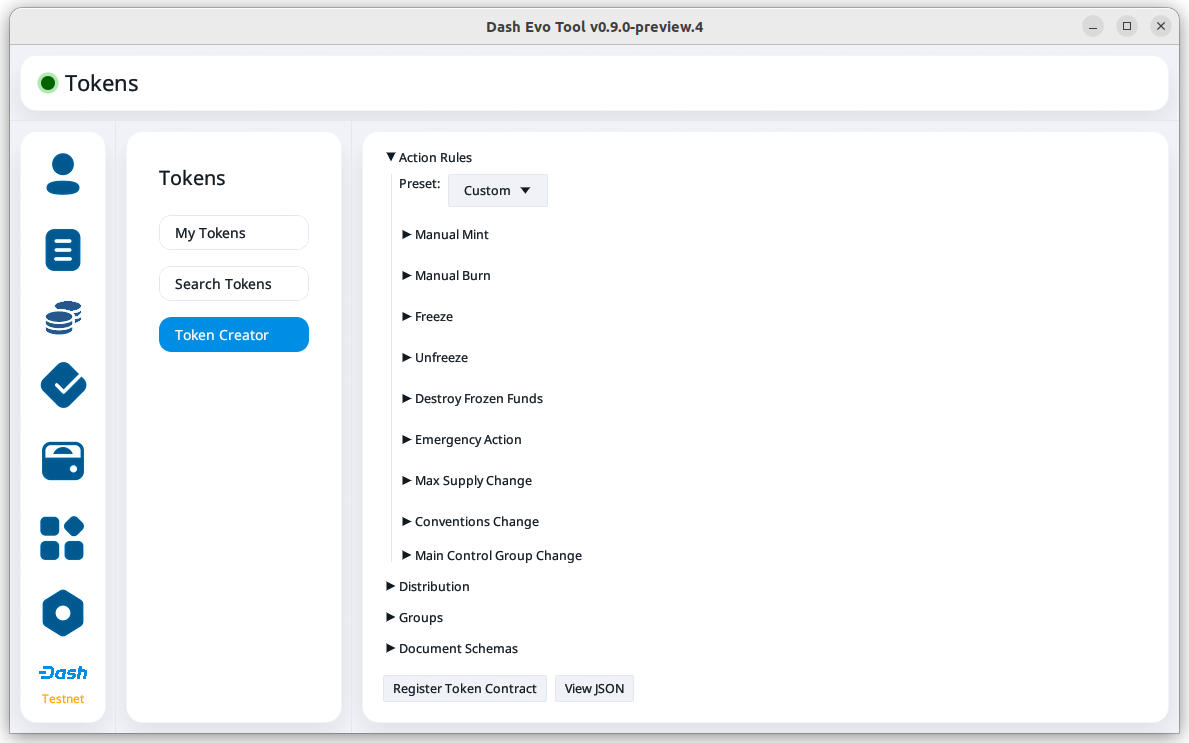
Token creator action rules#
Manual Mint: Allow creating additional tokens
Manual Burn: Allow destroying tokens
Freeze: Freeze balances of individual addresses
Destroy Frozen Funds: Destroy frozen balances
Emergency Action: Permit emergency actions
Max Supply Change: Allow changes to the maximum supply
Conventions Change: Allow changes to token conventions (supported languages, etc.)
Marketplace Trade Mode Change: Allow changes to trading mode
Direct Purchase Pricing Change: Allow changes to direct purchase pricing
Main Control Group Change: Allow changes to the contract’s control group
Presets
The Dash Evo Tool provides several pre-defined action templates to simplify token configuration:
Rule Preset
Description
Custom
Allows setting all action rules independently for maximum flexibility.
Most Restrictive
No actions are permitted after initialization. All governance and control settings are immutable. Suitable for tokens that should remain fixed and tamper-proof.
Only Emergency Action
Only emergency actions (e.g., pausing the token) are permitted. Minting, burning, and advanced operations (such as freezing) are disallowed. This preset allows minimal control for critical situations without risking token supply or ownership manipulation.
Minting and Burning
Allows minting and burning operations, but not advanced features such as freezing. Enables supply management without enabling full administrative capabilities.
Advanced Actions
Grants the ability to perform advanced actions, including freezing and unfreezing balances. Minting and burning are also permitted. Suitable for tokens that require moderate administrative control without total override capabilities.
All Allowed
Enables all actions.
Distribution Options#
Define token distribution using perpetual and/or pre-programmed options:
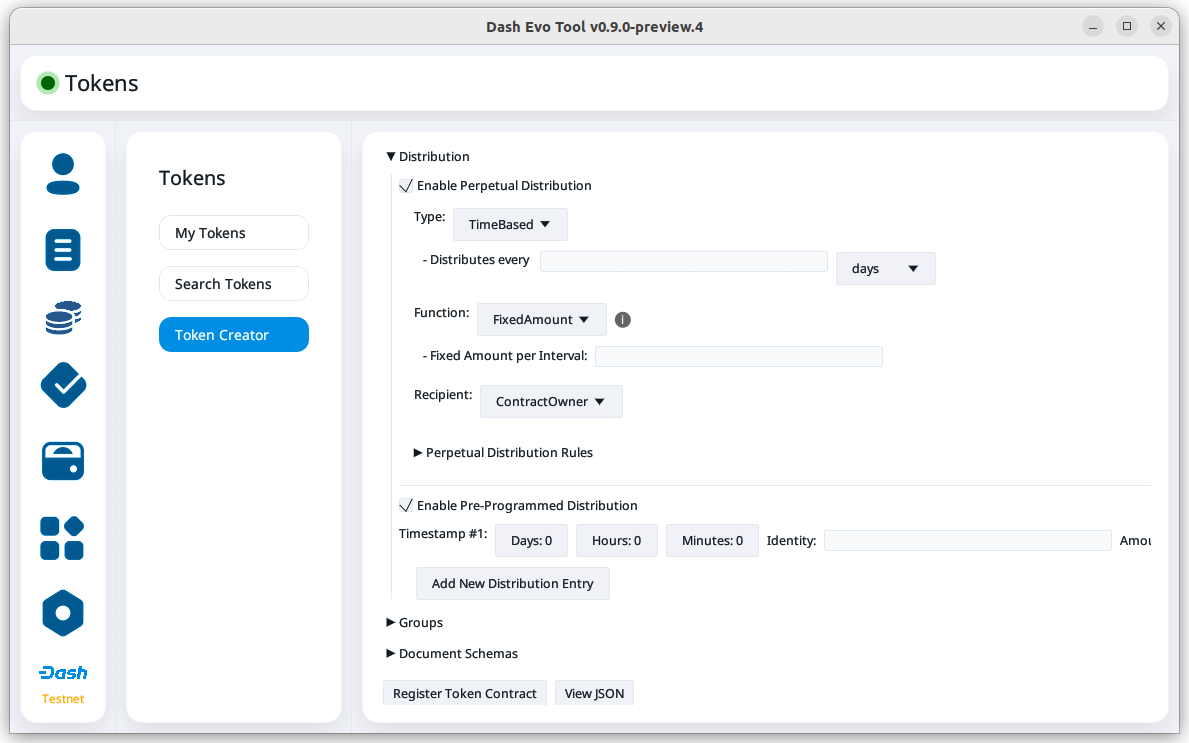
Token creator distribution#
Perpetual Distribution
Automated recurring token distributions:
Enable: Activates automated distribution
Type: Distribution trigger type (e.g.,
BlockBased)Distributes every (interval): Block, epoch, or time-based interval between distribution events
Function: Distribution model (e.g.,
FixedAmountper interval)Recipient: Identity receiving distributed tokens
Pre-Programmed Distribution
One-time or scheduled future distributions:
Enable Pre-Programmed Distribution: Enables scheduled events
Add New Distribution Entry: Create new pre-programmed distribution event
Groups (Optional)#
Define multi-party shared control of the contract:
Add New Group: Create a control group
Main Control Group Position: Set primary group responsible for contract ownership and administration
Register and Review#
Register Token Contract: Submit and register the token contract on Dash Platform
View JSON: View full contract schema prior to registration
Group actions#
The Group Actions screen allows querying group action requests. Select a contract and an identity, then click Fetch Group Actions to see all related group actions request.
Click the Take Action button to open the approval screen for a specific request.
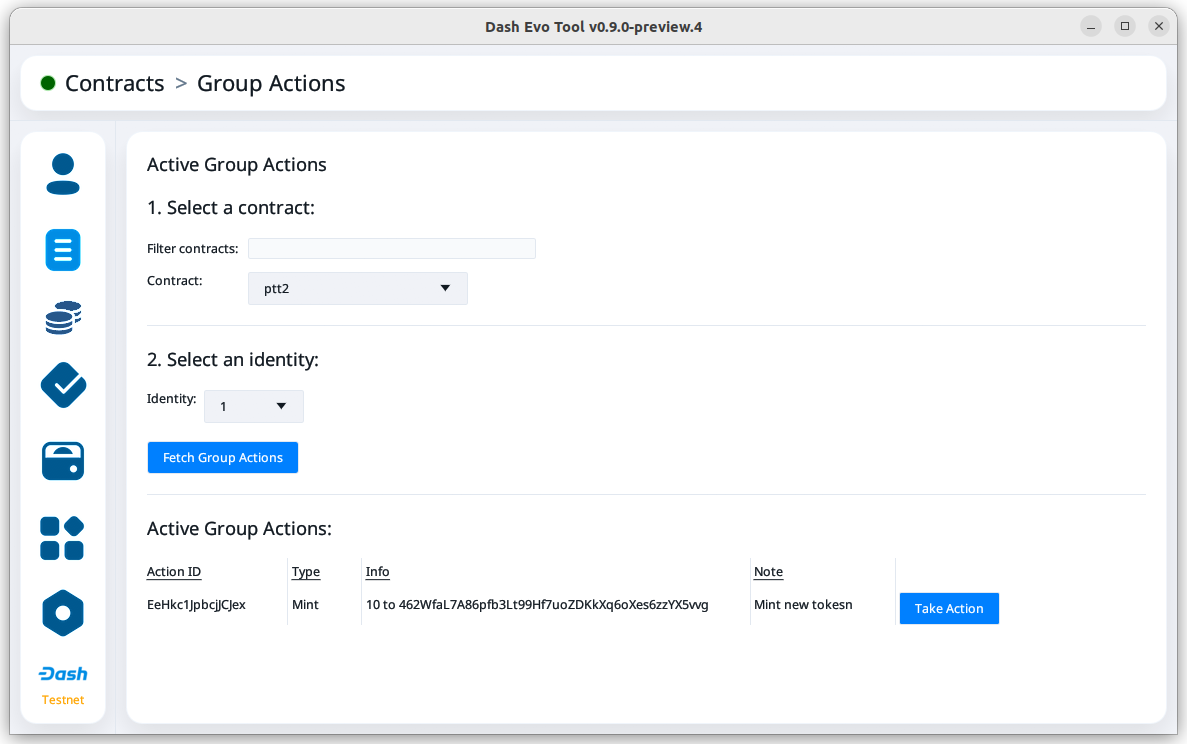
Group Actions screen#
On approval screen, select the key to sign the request. Then, click the Sign <Action> button. When the confirmation screen opens, confirm that the action details are correct. Finally, click Confirm to complete your approval of the request.
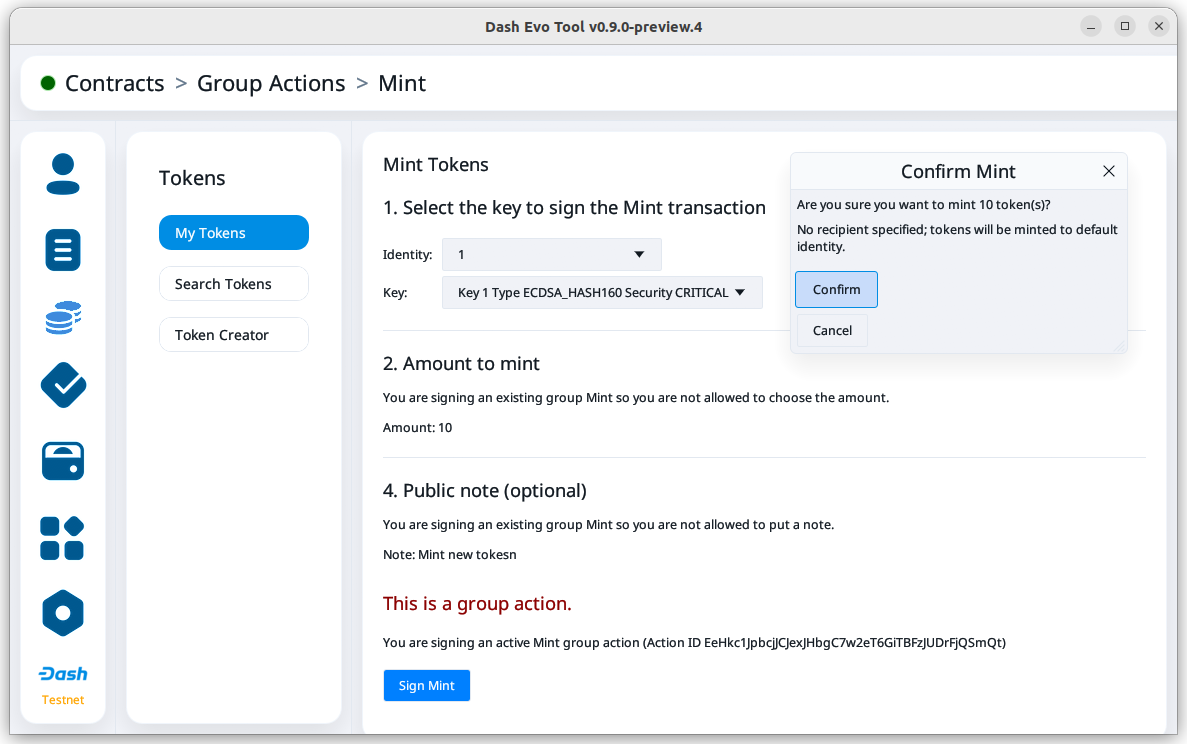
Group Actions Approval screen#
Wallet operations#
Note
The Dash Evo Tool wallet features only work if your Dash Core node has a single wallet open. If you have multiple wallets open in Dash Core, close all of them except the one used by the Dash Evo Tool.
Create wallet#
This tool includes a basic wallet feature to support identity registration. Wallets can be added from the wallet screen.
Attention
Since this tool adds watching-only addresses to Dash Core when creating identities, it is recommended to close all existing Dash Core wallets and create a new wallet for the Dash Evo Tool. Also, make sure to backup your Dash Core wallet.
Click Create Wallet to create a new wallet.
Wallet screen#
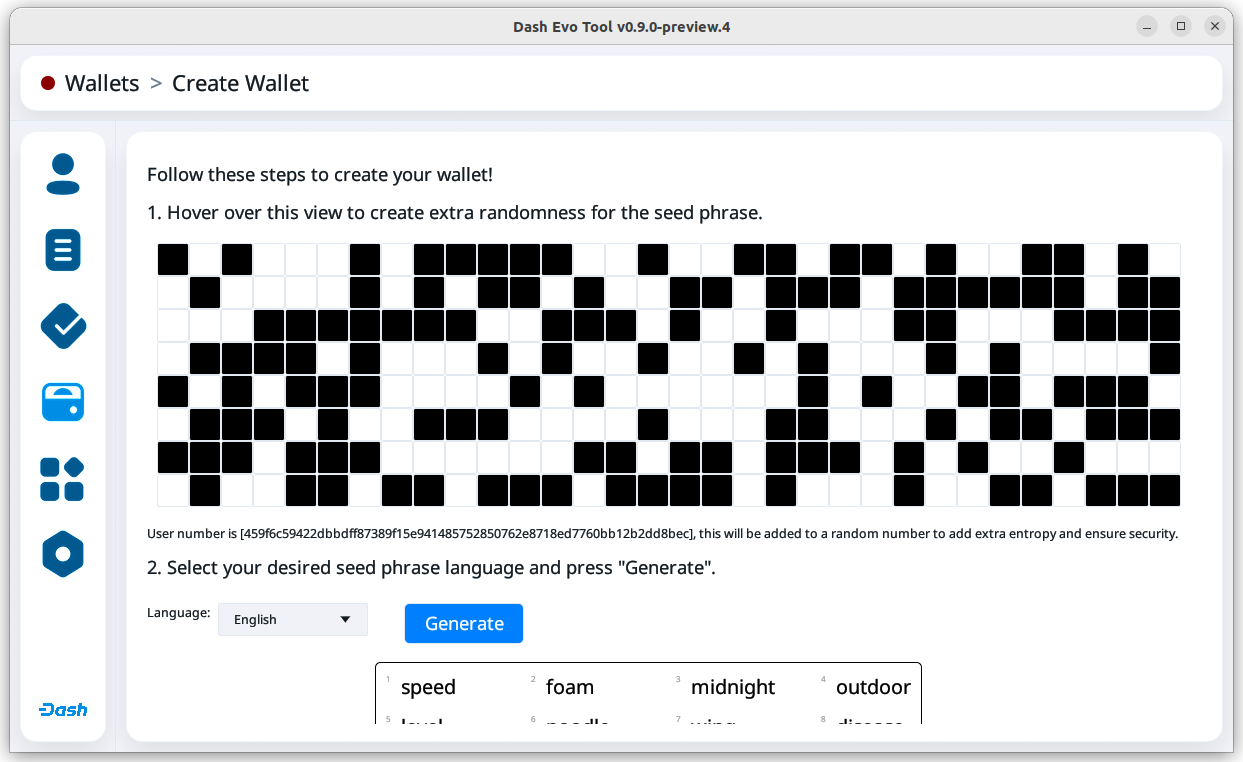
After creating extra randomness with the mouse, select your preferred language and click Generate to display you passphrase. Write it down and store it securely.
Wallet create screen#
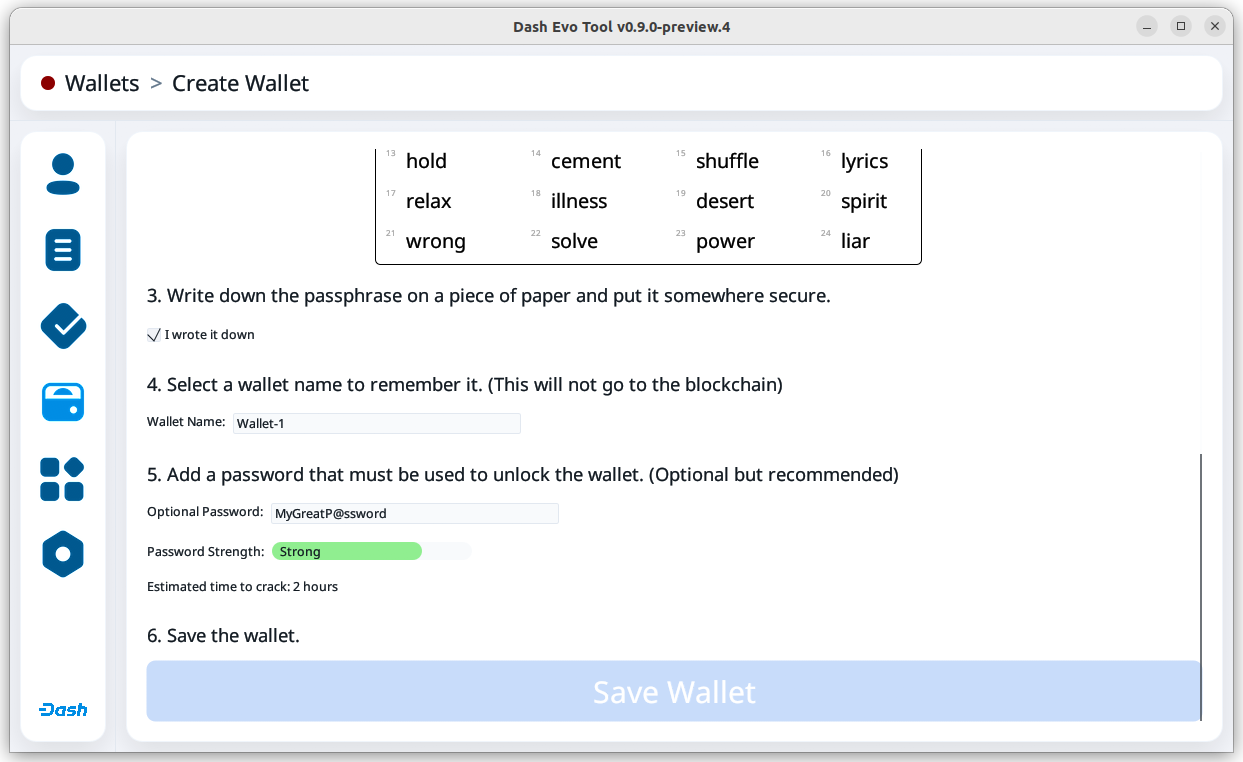
Click the checkbox in step 3 to confirm you have saved the passphrase. Next, enter a wallet name and optionally add a password before clicking Save Wallet to store the wallet.
Wallet create screen#
Use wallet#
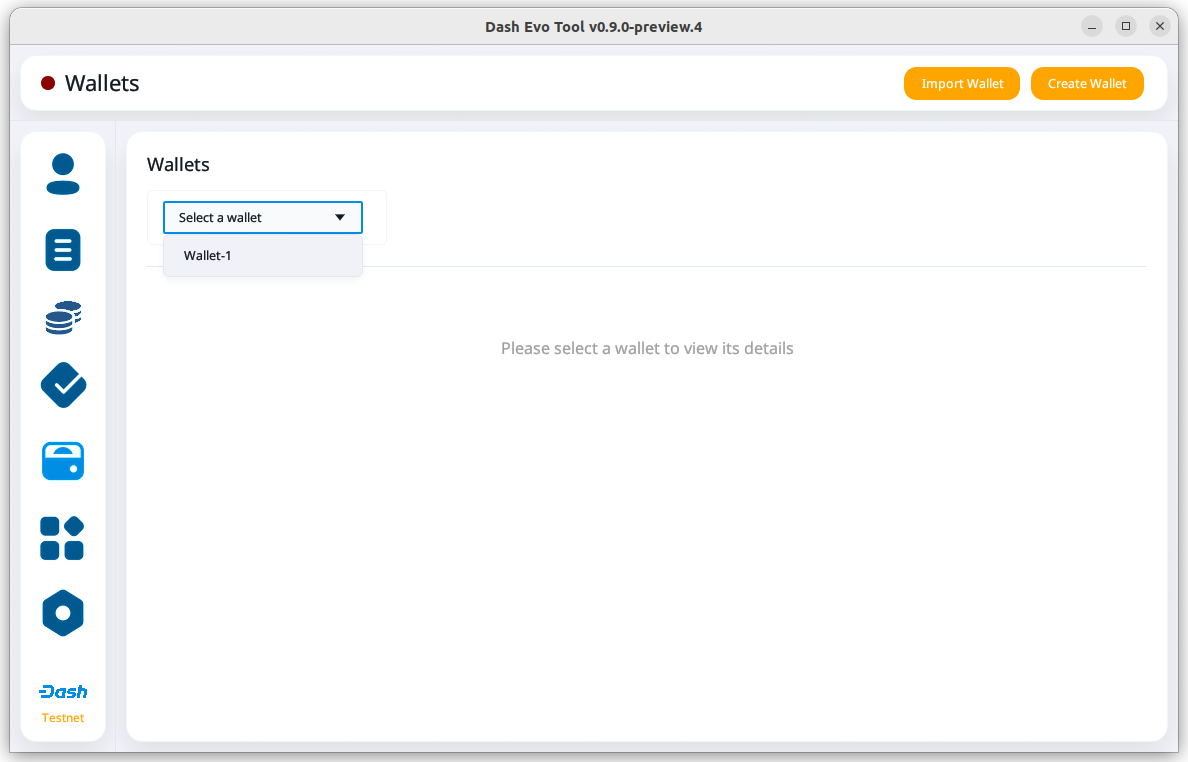
Select your wallet using the dropdown box.
Select wallet#
Funds#
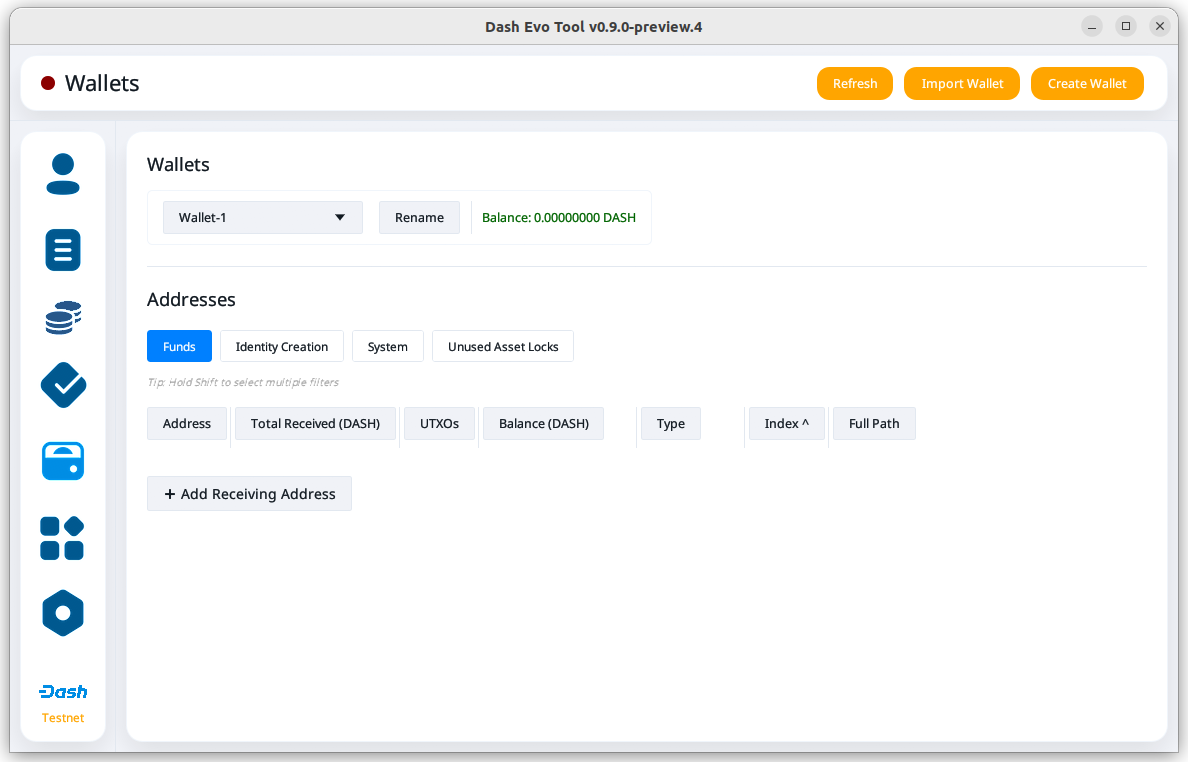
Several tabs display wallet details. The Funds tab shows your receiving addresses. Click Add Receiving Address if you want to add additional addresses to fund the wallet.
Wallet Funds tab#
After adding addresses, they will appear in a table with balance and other details.
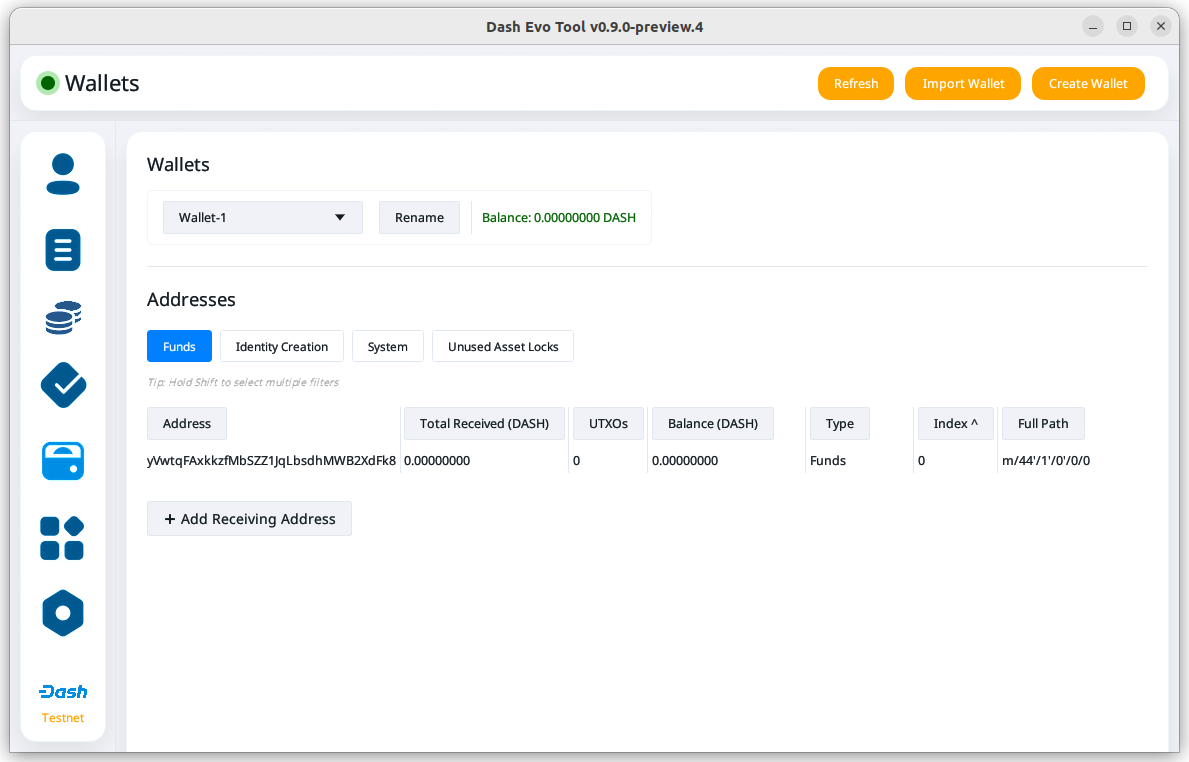
Wallet with address added#